Setting Up your "www" Site
The following steps will guide you through the process of using the McFarland book to set up a main "www" site to use throughout the semester.
You will also post your class folder to the web server, visit the "index" page with your browser, find the page you created in McFarland's first chapter, and copy the URL of that page to a Moodle forum.
1. "Introduce" Your Site to Dreamweaver
1. Follow the steps on McFarland pages 609-615 for setting up Dreamweaver to move files between your USB and the Web server. You will also need the following UMD-specific information: (see this page for help with Dreamweaver CS5)
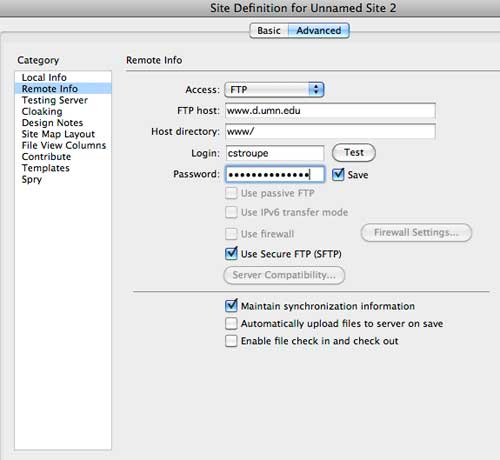
2. In setting up your "remote info" (a.k.a. "Server" information), you will need the information particular to UMD's server below. You'll use your UMD login and password in place of mine.
3. Be sure to choose the checkbox "Use Secure FTP" (a.k.a., "SFTP"). Because of security, file transfer won't work without this option.
4. After clicking the "Test" Button, deselect the "Save" check box so you don't risk leaving your password-protected files vulnerable on the public computers in the lab.
2. Post your "4230" Folder to the Web
In Dreamweaver's "Files" panel on the right side of the workspace, you should see the contents of the "www" folder on your USB drive.
- Click once on the "4230" folder to highlight it.
- At the top of the Files Panel, find the Up-Arrow Icon (also known as the "Put" command). Click that Up Arrow to "put" the 4230 folder up on the server.
- You may be prompted to provide your password (if you followed the direction above)
3. Visit your "4230" folder on the web
- Go to UMD's home page.
- In the browser's location bar at the top, click at the end of the URL "http://www.d.umn.edu/" and type in a tilde (~), your userid, a forward slash, and "4230" so it looks like this: http://www.d.umn.edu/~youruserid/4230.
- Hit Return (or Enter)
- From the "index page" that appears, click "exercises" and then "Chapter01" and then "about.html"
4. Submit the URL of your "about.html" Page (from Chapter 1) for Credit ![]()
- With your "about.html" page appearing in the browser window, copy the URL from the browser's location bar
- Visit the Moodle forum "McFarland C1."
- In a reply to my message at the top, paste in the URL
- Highlight the pasted URL, and click the link icon above the message window
- Paste the URL again into the "URL" box and click OK
5. Save Your Site Information
When you move from computer to computer--or come back to a lab computer later--you will find that the sites you set up in Dreamweaver have disappeared. It's very helpful, then, to be able quickly to reinstate your site settings without having to recreate the site from scratch. To do that, you need to export the site settings to your USB drive so you will be able to import them on elsewhere or later:
- choose "Site > Manage Sites > Export."
- Save the exported site information (in a .ste file) at the top level of your USB drive where it will be easy to find.
- [When you come back later--or move to a different computer--choose "Site > Manage Sites > Import" to navigate to your USB drive and choose "www.ste" to import. You can make .ste files for as many of your sites as you wish.]