BY TOM SKELTON
courtesy of
Dance Magazine
first published
October 1956
TOOLS OF LIGHTING DESIGN: LIGHTING MISCELLANY
Dimmerboard Technique
The professionalism of the performance will also be affected by the ability of the man who operates the dimmerboard. Most professional electricians have developed a certain technique that may not be obvious in a performance, but lack of technique will stick out like a sore toe.
If there is supposed to be a master fade-out, all of the lights should go out evenly and simultaneously. An amateur electrician might fade one dimmer out, then another, and finally the last. I’m sure you’ve seen this happen and know how strange it looks. If the electrician has too many dimmers to handle at once, he may need an assistant. Of perhaps the fade-out cue can be “broken down,” so that certain spotlights can be faded out earlier and the remaining lights brought down on a master dimmer on cue.
Any time the handles of the dimmers are moved it must be done smoothly. Sticky dimmers should be oiled so that they don’t move in jerks. This is especially important for dimmers that control the lighting on the sky drop. A sky is so large that any change of light on it is very obvious to the audience. Therefore, the sky dimmers should be carefully marked so that the electrician is always aware that “these are the dimmers that require especially smooth operation.”
Another technique that the novice should learn is the so-called “relative dim.” To illustrate this, imagine a magenta sky (which is produced by having the red borderlights up to full and the blue borderlights at half). If the sky is supposed to fade out, the novice electrician may bring the red dimmer down to half and then take both the red and the blue dimmers out. To the audience it looks as though the sky changes from magenta to purple, and then fades out. A “relative dim” is the technique of fading the red from full to out and at the same time fading the blue from half to out. To the audience it will look like a magenta sky that fades out, which is as it should be.
Some electricians tend to be a little nervous if they make a mistake and bring up the wrong cue. Then they “bang in” the right cue as soon as they discover their mistake. A calm electrician, on the other hand, knows that if he makes a mistake the best way to correct it is to “sneak up” the right dimmers so slowly that no is the wiser. By slowly and calmly making a transition into the right cue, the lighting is obviously not as good as it could be, but at least strange lights aren’t banging off and on while the poor ballerina is trying to hold a balance.
Gray Gelatine
When you have no dimmerboard and a spotlight is too bright, use gray gelatine in conjunction with the colored gelatine. If your pink spotlight is too bright, a layer of gray will make it less bright without changing the color value. To use a darker shade of pink, which might seem easier on first thought, would have a quite different effect.
Frost Gelatine
Frost is a translucent gelatine without color. Its purpose is to diffuse the light from the spotlight so that there are no sharp edges on the light beam, as though you covered the spotlight with a piece of white silk. It is usually used in conjunction with a colored “gel.”
Since it is a diffuser, it cuts the efficiency of the spotlight and tends to spread the light beam far and wide. To counteract this, a hole can be cut in the center of the frost so that only the edges are diffused. If the hole is cut in a star shape there is no definite line to show where the intense light ends and the softened light begins. Sometimes it is necessary to soften only one side if the light beam, so that only a small strip of frost need be inserted on the side of the gel frame.
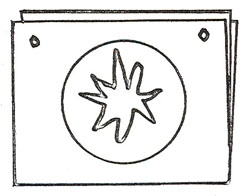
“a hole in the center of the frost”
If no frost is available, a substitute method of softening the spotlight’s beam is to lightly sandpaper the colored gelatine in order to make little scratches that diffuse the light.
Projections
Projections are used quite successfully in Europe, but that is because the European opera houses usually have stages that are at least 50 feet deep. A great deal of space must be available for a projection to work properly.
The Linnebach Lantern is generally used for projections, with a glass painted slide. But the Linnebach spreads at a ratio of only 1’ to 1’, which means that if you want a picture to be 12 square feet, for example, you have to have 12feet of available space for the projection itself. On the average American stage of 25 feet, this 12 feet represents half of the stage; and very few dance companies can spare this amount of space.
The Linnebach can be used for “back projection” by placing the lantern in the center of the back wall and projecting the image onto the back of a translucent screen hung downstage, or it can be used for “front projection” by mounting the lantern overhead on a batten or in one of the downstage wings. In the latter case, the problem of distortion enters, and the glass slide must be hand-painted very carefully in comparable distortion to compensate. This is a tremendously difficult task for any but the most experienced slide-painter.
With any type of projection, a flat surface is needed for the projection. All lighting of the dance area should come from the side, and even then there will be a certain amount of unavoidable spill and reflection that will “water down” the sharpness of the projected image.
Effect projectors which will provide moving effects of fire, clouds, rain, etc. can be rented from most theatrical lighting companies. The rental is high, and the effect is of limited value since, like movies, the stage must be almost completely dark for the effect to show. Such realistic effects are rarely required by dance, but a few times they are required they must be incorporated so carefully into the choreography
(To be continued next month)