In this lab you will modify the JavaScript problem solver from the
previous lab (see menu at left) to get some experience manipulating the
Document Object Model (DOM).
Specifically, you will make changes so that:
- When the user solves a problem, the problem panel is replaced
with a congratulatory message styled with Cascading Style Sheets
(CSS)
- The user is given the option to continue or to quit
Using the same procedure you employed in the
Javascript Lab Exercise
(see menu to the left), download this
JQueryProblemSolver.zip file
and create an HTML5/JavaScript project
called
JQueryProblemSolver.
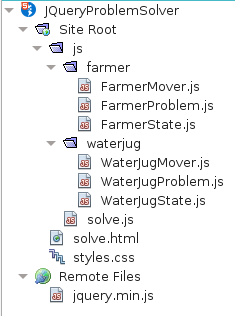
When finished, your project structure must look like this:
On the NetBeans tool bar, select your desired browser (ignore browsers
with "NetBeans Connector").
Right click
solve.html and select
Run File. You will be
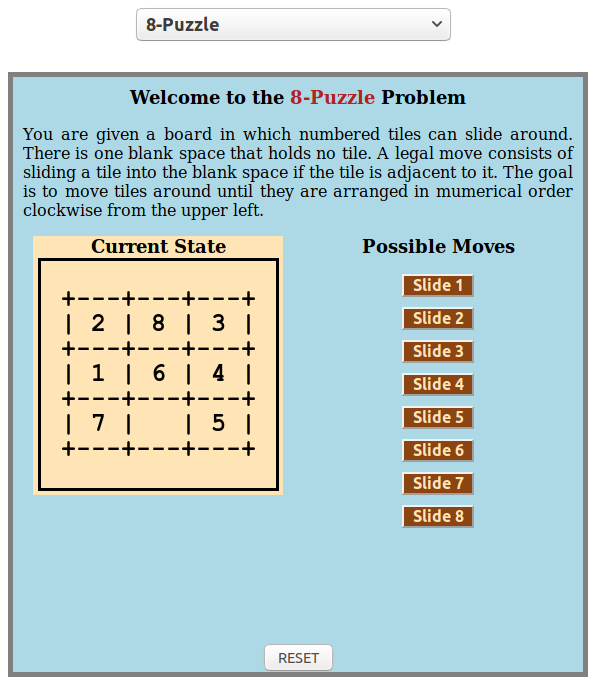
brought to a problem solver page like this:
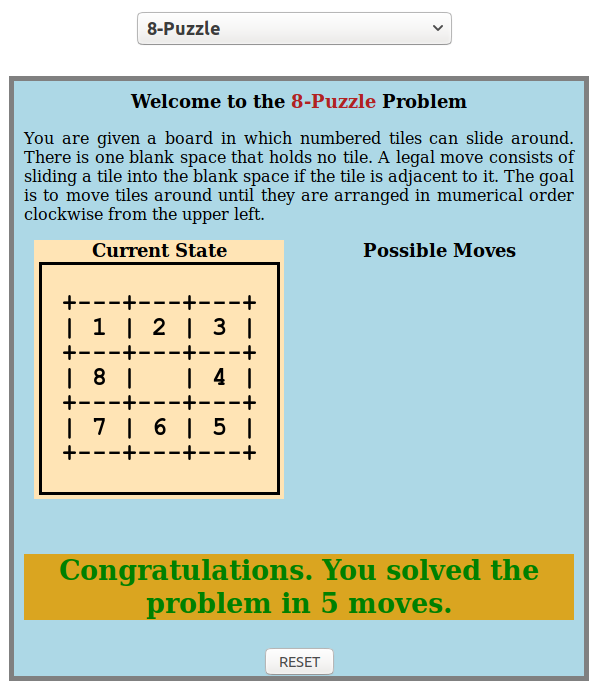
In the code that is provided for you, when the user solves a problem
the display is as shown below.
This section describes the required alternate behavior and how to
achieve it.
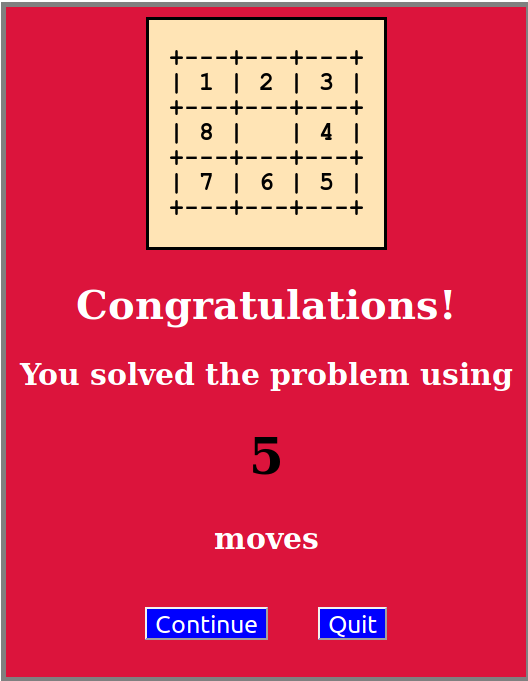
Your job is to modify the code so that a congratulatory page is
presented as shown below. Note:
- The chooser element and problem display have been hidden, and an
element appears whose background
color is crimson, whose size is 500 × 650 pixels, and
which shows:
- The final state of the problem (background color
is moccasin)
- A congratulatory message using a variety of font sizes
(50px, 40px, and 30px) and colors (white and black).
- Navigation buttons (see next) with blue backgrounds and 25px font.
If the user clicks
Continue, the congratulatory element
disappears, the chooser element reappears, and the originally displayed
problem is reset and displayed normally. See
Continue at left.
If the user clicks
Quit, a "GOODBYE" message replaces the
content of the congratulatory element, but whose
text color is
aqua and text size is 40px. See
Quit at
left.
Changes only have to be made to the
ProblemPanel.js file, which
controls the elements displayed, and the
styles.css file, which
defines the CSS style classes used.
ProblemPanel.js is in the folder
js/framework/gui.
You need to modify what happens when the user solves a problem. This
can be accomplished by changing the
addActionForButton function so that
when the problem is solved, a new function, say
congratulate, is
called:
congratulate then produces the required behavior by modifying
the DOM.
Below is an example of a web page that dynamically changes during user
interaction. To the right are the CSS rules that give the page its
style:
The initial HTML code for the demonstration page is shown below.
Note that the
body element is empty; it will be given children
by the
init function defined in
demo.js.
Here is the
general approach taken by the JavaScript code:
- Declare variables representing DOM objects for all parts of the
page, both those that are initially displayed (the title header and
Click Me button), and those that are
added during user interaction (a panel containing some text and
the Go Back button)
- Write the init function to:
- Create all of the DOM objects and give them style
classes
- Add the title header and Click Me button to the
document body for initial display
-
Write click event handler functions (callbacks) for the Click Me
and Go Back buttons that appropriately hide or show elements
in the document body to give the page its desired behavior.
These handlers are given to their buttons at the time the buttons
are created by the init function.
To manipulate the DOM using plain JavaScript, we use the following
objects and methods:
- document: an object representing the document being
displayed
- document.body: a property of the document representing
the document's body
- createElement: a method allowing the creating of
HTML elements
- innerHTML: a property of elements holding their inner
content, like the label of a button or the text of a div
- className: a property of elements holding their CSS style
class
- onclick: a property of button elements holding the
function to be evaluated when clicked
- appendChild: a method allowing the adding of an element to
another element's children
- removeChild: a method allowing the removing of an element
from another element's children
These objects and methods are used in the code (see
Plain JS
Code in menu to the left) to obtain the behavior shown in the
demonstration.
To manipulate the DOM using jQuery, we use the following
selectors and methods:
- $("body"): a selector that returns the document's body
- $("<element></element>"): a
selector that creates and returns a new element, for
example, a button or div
- text: a function that sets or gets the text of an
element, like the label of a button or the text of a div
- addClass: a function that sets an element's CSS style
class
- click: a function that triggers or sets the function to be
evaluated when a button is clicked
- append: inserts content to the end of a selected element
- remove: removes a selected element, including all text and
child nodes.
- hide: hides a selected element
- show: shows a selected element
These selectors and methods are used in the code (see
Code in
menu to the left) to obtain the behavior shown in the
demonstration.
This section lists the files used in this lab exercise.
The js folder contains the generic solver code and subfolders
holding the JavaScript files for the problem domains.
The JavaScript files for the FWGC problem are complete and described in
the lecture.
The JavaScript files for the Water Jug problem are analogous to their
counterparts in the FWGC problem.
- Notice that the Chooser constructor places the problem
selector and current problem display in a div whose DOM id
is "chooser":
Thus, the chooser and problem display can be easily hidden using:
and shown using:
-
You can use the problem's SolvingAssistant object to get the move
count and for resetting the problem. See
the addActionForButton function in
the ProblemPanel constructor for examples of the assistant's
use.
When your program is working correctly:
- Outside of NetBeans, re-zip (compress)
your JSProblemSolver folder as JSProblemSolver.zip.
- Submit JSProblemSolver.zip by going to
and clicking Submission under Lab Exercise:
DOM.
Note the general
Submission Policy in the menu at left.
Your project will be inspected, tested, and run by the lab instructor. Grading criteria:
- Navigation requirements met: 6 points
- Style requirements met: 4 points