A
version control system is project support software that allows:
- Storage of file documents in a central repository
- Access to files through a checkout process
- Updating of the repository by allowing users to commit
changes to files they have checked out
- Synchronization of files checked out by multiple users through an
update process
Version control systems can be used to organize any collection of documents,
including NetBeans project files.
This presentation describes how to use
Subversion to set up a
repository, and how to use NetBeans to access it.
NetBeans provides support for three version control systems:

This presentation shows how to use
Subversion with NetBeans.
Subversion uses a
client-server architecture.
The
server stores the repository and handles
clients'
requests for access:
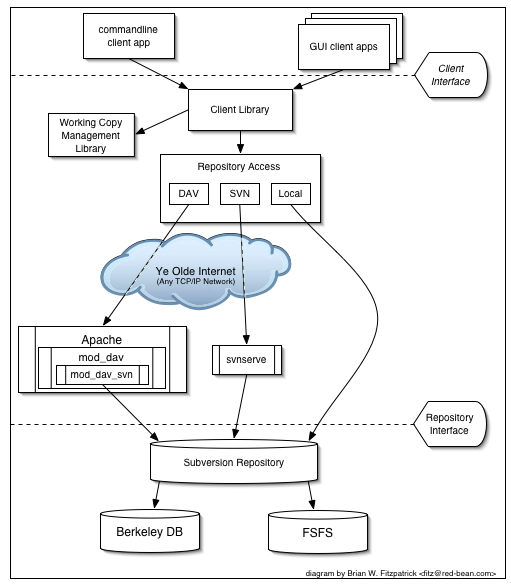
The Subversion server program is called
svnserve.
One of the members of your team could run the server on their own
server machine if they have one. This would require that the machine be:
- Constantly connected to the internet
- Constantly up and running svnserve
Or, your team can make use of the CS Department file server, an
approach that will be described in this section.
All CS and CIS majors have disk space provided by the CS Department.
This space resides on a file server with host
name
ukko.d.umn.edu, and where Subversion is installed.
Once your team has started a server and configured a project repository, you
will be able to access it through NetBeans and a subversion client.
There are five basic steps:
- Login to ukko
- Create the repository
- Authorize a repository user
- Configure the server
- Manage (start and stop) the server
It is important that the same person perform these steps, because the
server process and repository folder must be owned by the same user.
In the descriptions that follow, suppose the person setting up the repository
has UMD username
smit0012.
You will need to be connected to the internet, and you will need to
know your UMD X.500 username and password.
If you are using linux/unix, open up a terminal window and do:
ssh smit0012@ukko.d.umn.edu
If you are using Windows, use an
ssh client like
putty.
After successfully logging in, you will be connected to
ukko via
a command-line interface.
Go to your CS Department disk space (if not already there):
cd /home/csugrads/smit0012
Create the repository, in this case called
cs4531project:
svnadmin create cs4531project
Make the repository folder publicly inaccessible:
chmod 700 cs4531project
Go to the configuration folder for the repository just created and
observe the configuration files (note that system responses are shown
in
green):
     cd cs4531project/conf; ls
     authz  passwd  svnserve.conf
You will need to edit
svnserve.conf and
passwd.
Use an editor (
emacs,
vi, or
pico) to open the
file
passwd and add a line (or lines) to the bottom of the form:
username = password
where
username and
password are made up by you
for your team members to share when accessing the repository.
(Apparently digits are not allowed in either.)
For example:
bill = billsecret
Since passwords are stored in clear text you should make sure that
the
passwd file is not readable by others (giving the
repository
700 permission sees to this).
Q: When a user accesses the repository remotely with a password, how
is it not transmitted over the network?
A: The server uses CRAM-MD5 authentication, in which the user's
password is hashed before sending. The same hash is performed on the stored
password, and the hashed results are compared during authentication.
Open the file
svnserve.conf and add these lines at the bottom:
     anon-access = none
     auth-access = write
     password-db = passwd
These indicate that:
- Anonymous access of the repository is not allowed,
- Authorized access has read/write permission, and
- The file containing your team's username and password
is passwd (the default).
Since each team will have its own server instance, each instance will
have to run on its own port.
Let's agree to have the teams use the following ports:
| Team | Port |
|---|
| 1 | 8001 |
| 2 | 8002 |
| 3 | 8003 |
| 4 | 8004 |
The rest of this section shows how to start and stop the server.
If
smit0012 is on Team 1 then he/she starts the server with:
svnserve -d --listen-port=8001
The
-d option runs the server in
daemon mode, which means
it runs in the background and will continue to run when
smit0012
logs off of
ukko.
The
svnserve daemon will run until
ukko is shut down
or
smit0012 or a sysadmin stops it.
To stop it, first find its process id:
     ps aux | grep svn
     smit0012 18386  0.0  0.0  98536  1128 ?        Ss   15:34   0:00 svnserve -d --listen-port=8001
     smit0012 18388  0.0  0.0   7624   896 pts/2    R+   15:34   0:00 grep svn
Here the process id is
18386. Now kill the process and confirm:
     kill 18386; ps aux | grep svn
     smit0012 18440  0.0  0.0   7624   916 pts/2    S+   15:39   0:00 grep svn
After the repository is set up any authorized user can access it
from any client machine that has a Subversion client installed, by
connecting over TCP/IP.
To get a Subversion client, you can go
to the
Subversion webpage and find binaries for most platforms.
Some Linux distributions provide package managers that make it easy to get
and install Subversion (for example, Ubuntu's Synaptic Package
Manager).
This section describes how to use a subversion client to access your
repository.
A client can access the repository by making command line calls:
     svn import ... Put files into the repository for the first time
     svn checkout ... Get files from the repository for the first time
     svn update ... Get changes to files others have checked out
     svn commit ... Commit changes to checked out files back into the repository
     ... etc.
These commands are documented in the
free Subversion book.
Or you can let NetBeans make the calls for you. We will describe
this approach next.
Note that NetBeans will assume you have a Subversion client installed.
Suppose you have a NetBeans project, say
MyProject, that you
want to
import into the repository so that it is available to your
team.
The rest of this section describes the import process.
Note that a project is imported into the repository only once. Files
are added or changed through a
commit process (described later).
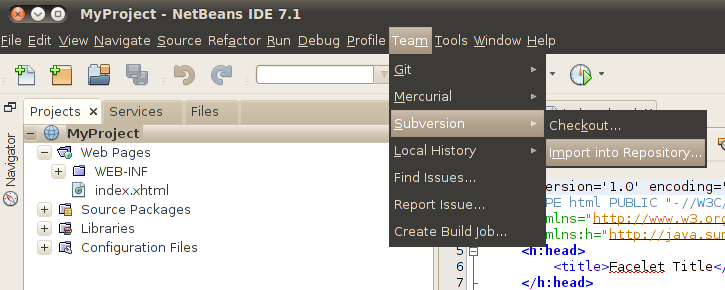
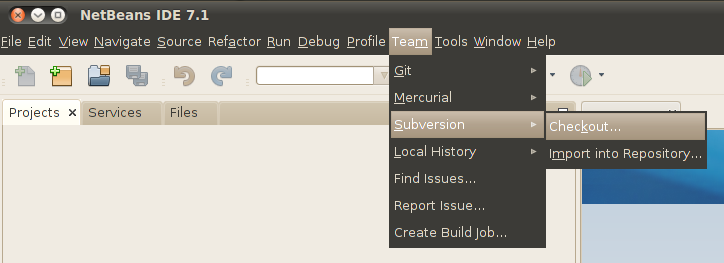
With
MyProject as your current project, select "
Import into
Repository ..." from the menu bar:
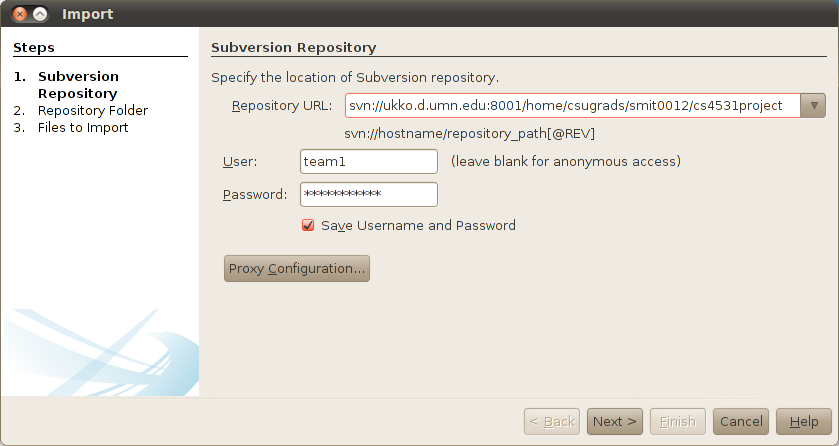
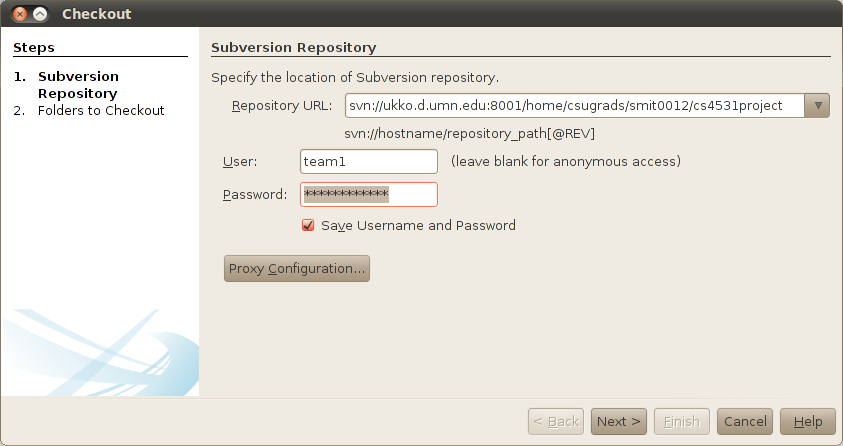
The resulting dialog calls for the URL of the repository with a
specific syntax, along with user credentials.
Here are the components of the URL for the example shown below:
| URL Component | In Example |
|---|
| Prefix | svn:// |
| Host | ukko.d.umn.edu |
| Separator | : |
| Port | 8001 |
| Path | /home/csugrads/smit0012/cs4531project |
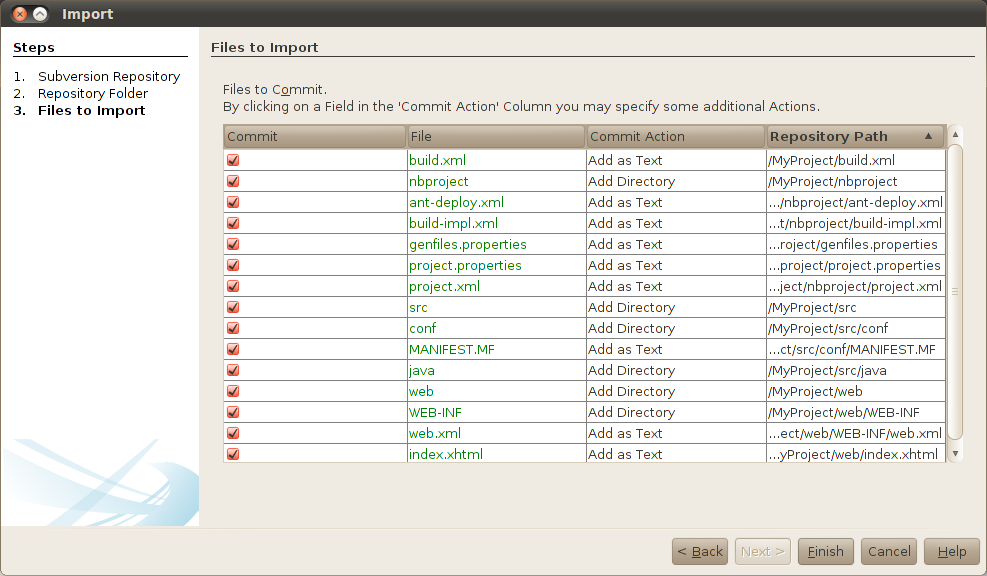
A documentation string for the import is required:
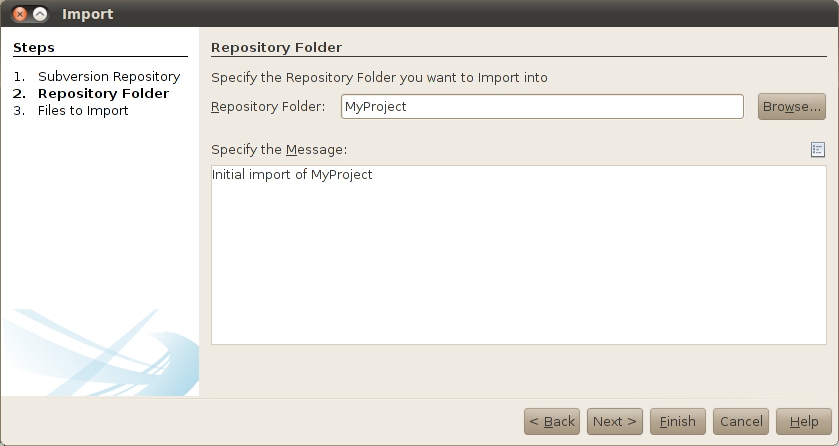
On the initial import, all NetBeans project files should be imported.
That way the entire NetBeans project can be
checked out by your
team members.
Once a NetBeans project has been imported into the repository, it can
be
checked out by authorized users.
As with importing, a project is checked out by a user just once, after
which arbitrary changes can be
committed to the repository.
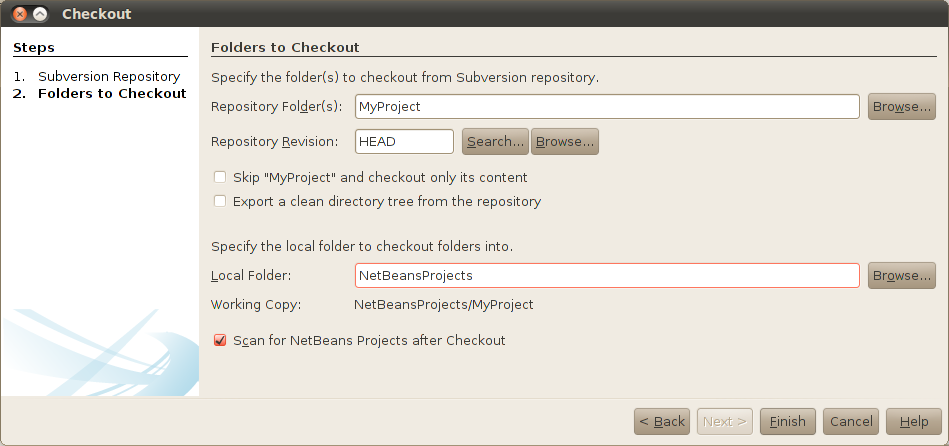
The rest of this section describes the checkout process.
Launching the checkout dialog is similar to launching the import dialog:
The repository URL and user credentials should be the same as those
used for importing.
Note that if you check
Save Username and Password, NetBeans will
remember your credentials for future repository transactions:
If you know the name of the folder you are checking out, you can
enter it directly here; otherwise you can click
Browse... to
choose from among the folders in the repository (there can be any
number).
If you check
Scan for NetBeans Projects after Checkout, NetBeans
will give you the option of opening the project after checkout:
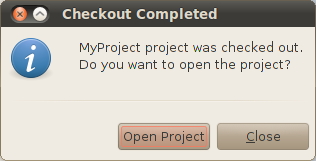
Upon clicking
Open Project, the project will be opened in
NetBeans.
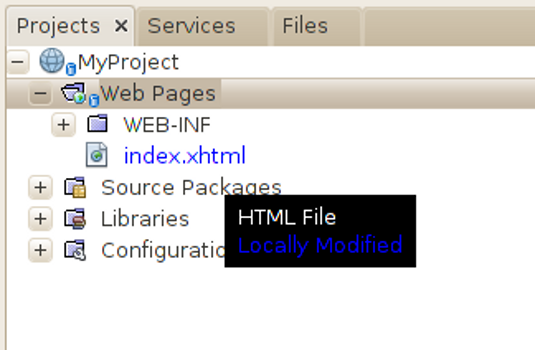
You can tell when you have made saved modifications to a file in a
checked out project:
- Its name is rendered in a blue font
- Its folder shows a small blue icon:
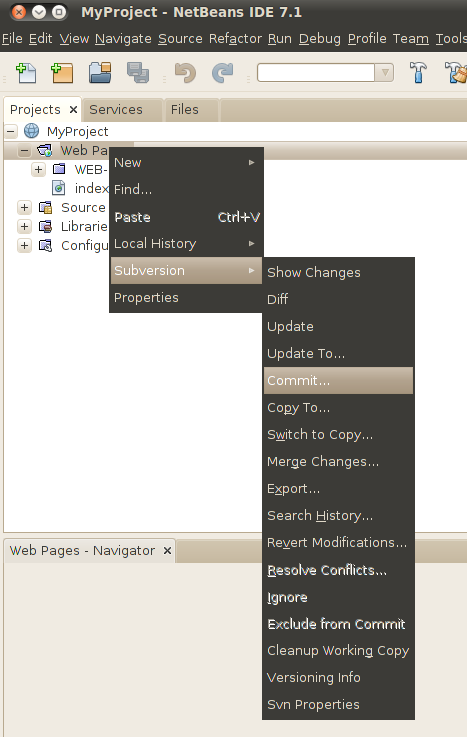
This section describes how to
commit your modified files to the
repository.
This example shows right-clicking on the modified
index.xhtml
file and selecting the Subversion commit operation:
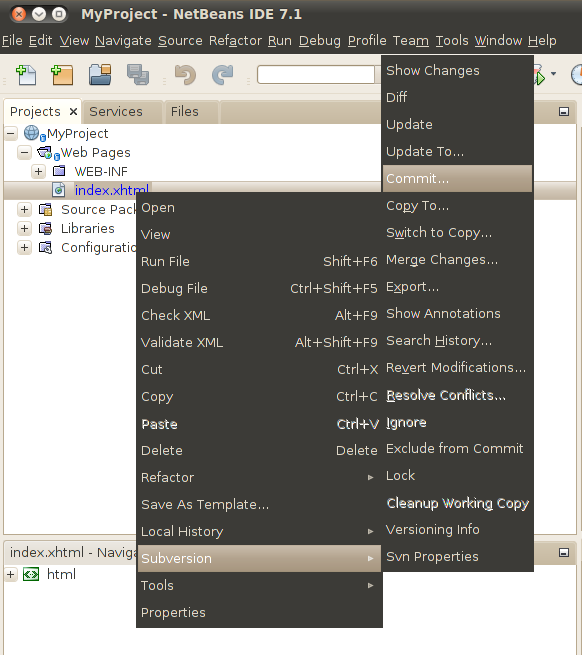
Commit operations require an accompanying documentation message:
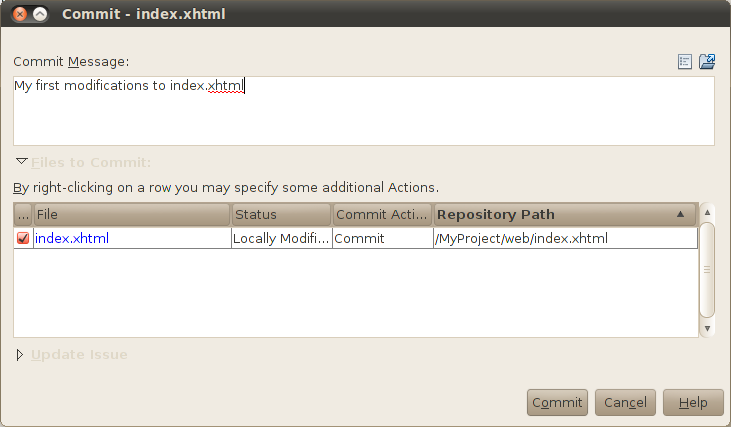
Note that NetBeans remembers your authentication credentials from when
you checked out the project.
After initiating the commit, in NetBeans'
Output tab you should
observe something like:
     ==[IDE]== Feb 24, 2012 12:23:21 PM Preparing Commit...
     ==[IDE]== Feb 24, 2012 12:23:21 PM Preparing Commit... finished.
     ==[IDE]== Feb 24, 2012 12:25:10 PM Committing...
     commit -m "My first modifications to index.xhtml" .../MyProject/web/index.xhtml
     Sending        .../MyProject/web/index.xhtml
     Transmitting file data ...
     Committed revision 3.
     Revision: 3
     Author  : team1
     Date    : Feb 24, 2012 12:13:56 PM
     My first modifications to index.xhtml

     ==[IDE]== Feb 24, 2012 12:25:12 PM Committing... finished.
If you have made changes to multiple files, you can commit them all at
once by initiating the commit on a folder, as shown to the right.
There, the
Web Pages folder has been right-clicked.
It is also possible to commit changes made to all files in the project
folder by right-clicking the project (in this case
MyProject), however:
Committing changes to an entire project is not recommended as
it may commit changes to project configuration (.xml) files
that can cause conflicts among the checked out projects.
Since all team members have access to the same repository, it is
possible that another member has already committed changes to a file
you are working on.
For example, suppose that while you are working on
index.xhtml,
another member commits a modified version of it to the repository.
When you try to commit your changes, Subversion will notice
that
index.xhtml has changed since the time you checked it out,
so it will force you to
update your version, which we describe
next.

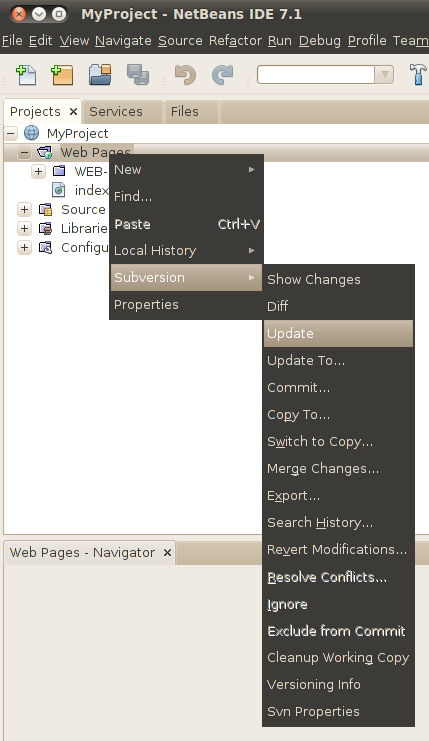
It is a good idea to regularly update your version of a project shared
among other team members, since
- It keeps you up-to-date on what your team is doing, and
- It minimizes the chances of having to manually resolve conflicts
This section describes the update process.
Since you probably don't know which individual files have been changed,
you would start the update process by right-clicking a folder:
After initiating the update, in NetBeans'
Output tab you should
observe something like:
     ==[IDE]== Feb 24, 2012 1:31:25 PM Updating "web"
     update ...
     U   .../MyProject/web/index.xhtml
     Updated to revision 4.
     ===== File Statistics: =====
     Updated: 1
     ==[IDE]== Feb 24, 2012 1:31:26 PM Updating "web" finished.
When you update a file you are working on with changes made by someone
else, those changes are
merged into your file gracefully
provided they do not
conflict with any changes that you have
made.
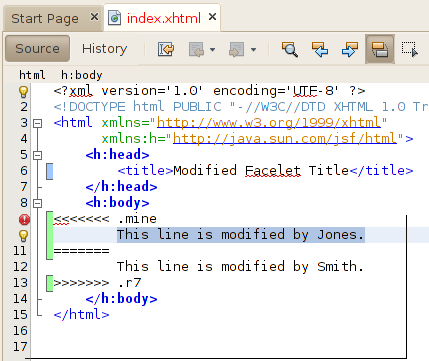
An update produces a conflict in a file if it introduces a modification
to a line that you have also modified.
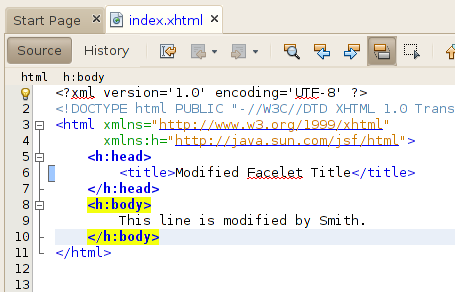
For example, suppose you have made a change to
index.xhtml such
that line 9 reads:
This line is modified by Jones.
Meanwhile someone has recently committed a change to
index.xhtml
in the repository such that line 9 there reads:
This line is modified by Smith.
Now you will not be able to commit your change without updating, but
when you update you receive the warning:
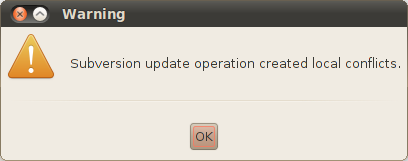
Now you have to resolve the conflict manually.
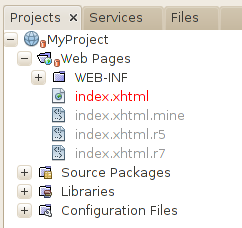
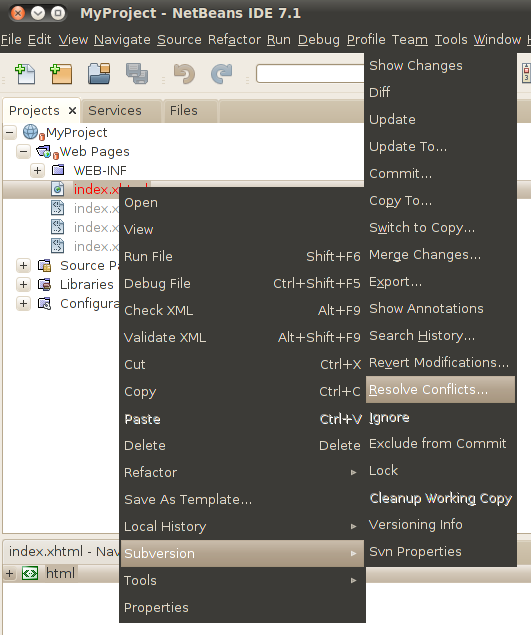
When an update introduces conflicts, they are indicated both in the
project structure tree and in the files where they occur.
Note that files with conflicts are shown in red, and the Subversion
icon has changed from blue to red:
To resolve conflicts, right-click the file with conflicts and navigate
to
Resolve Conflicts...:
NetBeans presents the conflicts by displaying the two file versions
(local and remote)
side-by-side and highlighting the lines in conflict.
When you decide to accept one version or another click
Accept
or
Accept & Next if there is more than one conflict to resolve:
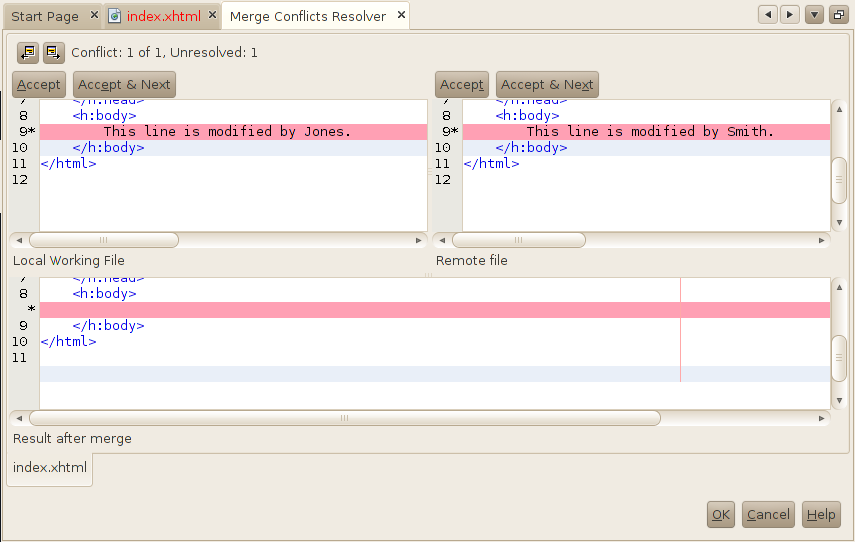
In this example the remote file version has been accepted.
Note that the remote changes have been incorporated into the
Result
after merge:
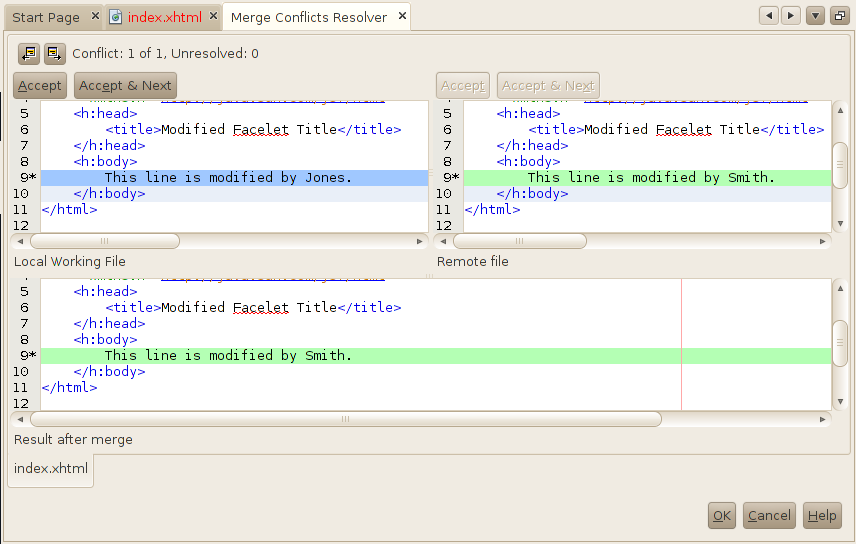
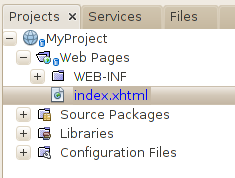
When finished with the conflict resolver you can save the changes
you've authorized, after which the conflicts disappear: