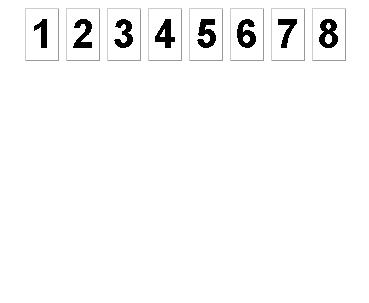
This button layout is achieved by the following applet:
// CS 2121 Lab Exercise 4
//
// Your name here

import java.awt.*;
import java.awt.event.*;
import javax.swing.*;

public class LayoutTest1
extends JApplet {

    // Panel and button font and color configuration.
    Font buttonFont = new Font("SansSerif", Font.BOLD, 40);
    Color panelBackground = Color.white;
    Color buttonBackground = Color.white;
    Color buttonForeground = Color.black;

    // This is the helper method for creating buttons.
    JButton createButton(String lbl) {
	JButton button = new JButton(lbl);
        button.setFont(buttonFont);
        button.setBackground(buttonBackground);
        button.setForeground(buttonForeground);
	return button;
    }

    // Create the eight buttons using a helper method.
    JButton b1 = createButton("1");
    JButton b2 = createButton("2");
    JButton b3 = createButton("3");
    JButton b4 = createButton("4");
    JButton b5 = createButton("5");
    JButton b6 = createButton("6");
    JButton b7 = createButton("7");
    JButton b8 = createButton("8");

    // Create a container panel with default Flow Layout.
    JPanel bpanel = new JPanel();

    public void init() {

        // Add the buttons to the panel.
        bpanel.add(b1);
        bpanel.add(b2);
        bpanel.add(b3);
        bpanel.add(b4);
        bpanel.add(b5);
        bpanel.add(b6);
        bpanel.add(b7);
        bpanel.add(b8);

        // Make the panel white and add it to the applet.
	bpanel.setBackground(panelBackground);
        getContentPane().add(bpanel);

    }

}
You will modify this applet to achieve various other layouts.
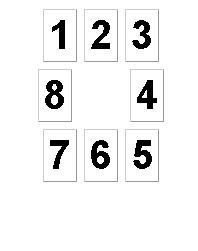
This is achieved by giving the JPanel constructor the argument new BorderLayout(), so that the buttons can be laid out against the border of the panel (see pages 116-17). The button labeled 4 can be laid out on the panel's East border, and button 8 on the West border. However, the North and South borders need three buttons each laid out on them. The way to do this is to create two subpanels containing three buttons each, and then add them to the main panel at the appropriate locations on the border.
Thus you will need to create two more panels, but they should use the default FlowLayout layout manager, since their components can be laid out left-to-right. Then you will need to call these panels' add methods to add the appropriate buttons, and you will need to add the panels themselves to the main panel.
When you get this working, move on to Step 2.
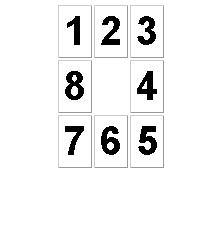
To do this modify the original applet LayoutTest.java. Create the main panel by giving the constructor the argument new GridLayout(3,3). Now when buttons are added they will be added left-to-right in the top row until the row is full, and then the second row will be filled from left-to-right, etc. The problem is the blank space in the middle. For now, add a new button labeled "0" to the panel in the blank space. Compile and run to make sure the results are what you expect.
Now, make the middle "0" button disappear by using the setVisible method from the Component class (page 103, bottom).