1. Start Macintosh System X computer and click on guitar icon
Lab #7
Digital Sound Editing
GarageBand 2
I. Purpose: A step-by-step tutorial for GarageBand2 software demonstrating how to create underscoring for theatre production. Other tutorials are available at:
QuickTime Movie <http://comtechlab.iupui.edu/tutorials folder/garageband.html>
Indiana University/Purdue University at Indianapolis
Garritan Orchestral Libraries
<http://www.garritan.com/garageband_tutorial.html>
iLife GarageBand Support
<http://www.apple.com/support/garageband/gettingstarted/>
II. Procedure for Opening Software Program :
1. Start Macintosh System X computer and click on guitar icon ![]() in the dock.
in the dock.
2. Select Create New Song.
3. Type in song title in Save As dialog box.
4. Click Create.
III. Set-up Procedure:
1. Close Grand Piano keyboard window.
2. Click green circle in upper left hand corner.
3. Go to Track menu, scroll down and click Delete Track.
4. Go to Control menu, scroll down and click Metronome.
5. At the bottom of the screen is a black box with blue numbers in it. Above the blue note, click on grey clock. (This changes the time signature from measures to real time.)
![]()
IV. Choosing Sound Loops:
1. Click on grey eye in the bottom left hand corner of the screen (Command L) to Show Loop Browser.
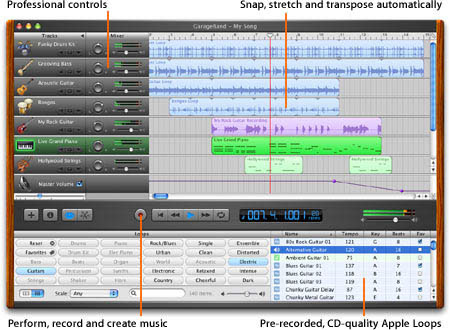
2. Click on wide grey horizontal bar and drag up to show all loop options.
3. Select an instrument in columns 1, 2, or 3. Choices can be narrowed by selecting one or more of the descriptors in black print.
4. Click on any of the sound samples on the right with a blue box icon to hear the sample. (Blue samples are musical instruments recorded for GarageBand. Green samples are MIDI instruments which will be studied later in the tutorial.)
5. Drag sound sample up to Editing screen so grey vertical line matches red vertical line.
6. Click on forward arrow icon to play song. (Or press space bar to stop and/or start song.
7. Use return icon or drag blue triangle above red vertical line to move to beginning of song. (Left and right arrows on keyboard may also be used.)
8. Place cursor on upper right edge of sound sample until a straight line and curved arrow appears.
9. Click and drag to the right until four copies of the sound sample appears.
V. Choosing Software Instrument Loops
1. Select "Bass" instruments in Loop Browser and sample sounds with green icons. (A green icon indicates a software instrument.)
2. Drag chosen sound sample into the Editing area below the first track.
3. Click on right edge of sample and drag to the right to make sample as long as the first track.
4. Play song to hear melody and baseline together.
5. Click on double white arrows in lower right hand corner of the Editing screen. When arrows are in line, tracks will scroll across the Editing screen to the left. when arrows are not in line, red cursor scrolls to the right only.
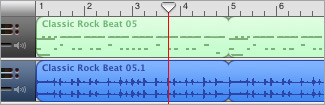
VI. Editing Tracks
1. Click on bass track and drag to measure 3. (Measures are shown above tracks.)
2. Scroll to end of song by using black arrows at the bottom right hand corner of the Editing screen or click and drag blue lozenge.
3. Move cursor to end of the bass track until you have the Line/Circle Arrow icon. Click and drag to left until Tract 2 lines up with Track 1.
4. Click on Scissors icon next to the Eye icon to open Editor (Command E).
5. In the lower editing screen, click on individual black boxes and drag to change pitch (up & down) or tempo (left & right), or to lengthen individual notes.
6. Transpose can be used to change pitch of all notes. Velocity can be used to change value of all notes highlighted.
VII. Substituting Instruments
1. Click on Plus icon on left side of grey bar to make a new track.
2. Click on Software Instruments and select Piano and Keyboard.
3. Select Smooth Clav on right side of dialog box.
4. Click Okay.
5. Click on Bass Loop and drag into Smooth Clav track.
6. Click Play to hear change.
VIII. Playback Options
1. In the Track description box is a picture of each instrument and three options. Click on Grey Speaker icon. When it turns blue, track is muted. Click on grey Headphones icon. When it turns blue, track is solo. Click on Arrowhead. when it turns blue, volume controls for track will appear.
2. Click Track Volume box.
3. Click along blue or green line to make circle control handles.
4. Move circles up and down to increase or decrease volume.
5. In the Mixer description box is a pan control and overall volume control.
6. Click L or R or move white indicator left or right to move track sound to left or right.
7. For overall volume control, move white ball to the left or right.
IX. Track Information
1. With Smart Clav track selected, click on the letter "i" (Command I) on the left side of the dark grey box to open Track Info dialogue box.
2. Select Guitars on left and Big Electric Lead on the right.
3. Hit space bar to sample change.
4. Experiment with the variety of instruments available.
X. Track Information Details
1. Click on Details inverted triangle at the bottom of the Track Info box.
2. On the left is a series of signal processors you can click or unclick as you prefer, including compressor, equalizer, amp simulation, chorus, echo and reverb.
3. On the input are a series of controls that allow you to choose a variety of predetermined attributes for each feature.
4. On the left are a series of Pencil icons that allow you to customize each attribute.
5. Click on the Repeat Symbol (an arrow bent in a circle) in the dark grey bar. A yellow bar will appear above all recorded tracks.
6. Move the bar, or extend the bar to cover the length of the track you want repeated.
7. Hit the space bar to hear the portion of the track selected repeatedly and adjust attributes as necessary.
8. Click on Save Instrument.
9. Save as Guitar-Your Name. Instrument you created will appear on the right side of Track Info dialogue box.
XI. Adding New Tracks
1. For convenience, clicking the "+" sign in the dark grey bar will add a new track.
XII. Using the Keyboard
1. In the Window pull down menu, click on Keyboard (Command K)
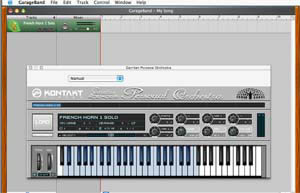
2. Open New Track and select instrument.
3. In the Control pull down menu, select Metronome and Count In.
4. Move red line to the beginning of the song.
5. Click Record button.
6. Metronome will give your four beats and then begin recording.
7. Move the mouse to desired notes on keyboard and track will record in real time.
8. Click on the Scissors icon (Command E) to alter any mistakes made in the recording.
XII. Master Track
1. In the Track pull down menu, click on Master Track (Command B).
2. Master Volume will appear below all recorded tracks.
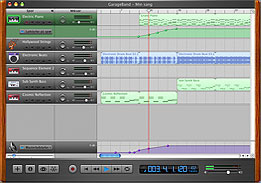
3. Click on Master Volume box and adjust volume to create a fade out at the end of the song.
XIII. Master Track Info
1. Click on the "i" in the grey bar.
2. Choose a category on the left and specific type on the right for an overall effect.
3. Tempo may also be altered.
4. Time signature and Key give you new sets of music samples and may be changed for future compositions.
XIV. Exporting Tracks from iTunes
XV. Saving Song
1. In File pull down menu, click on Save (Command S).