In this assignment you will add screens to the app you created in the
Android lab exercise (see menu at left) that allow the user to solve
the
Farmer, Wolf, Goat and Cabbage (FWGC) and
8-Puzzle
problems.
This will involve porting the non-GUI aspects of your
Java
ProblemSolver project to your Android
ProblemSolver
project.
Project requirements are described next.
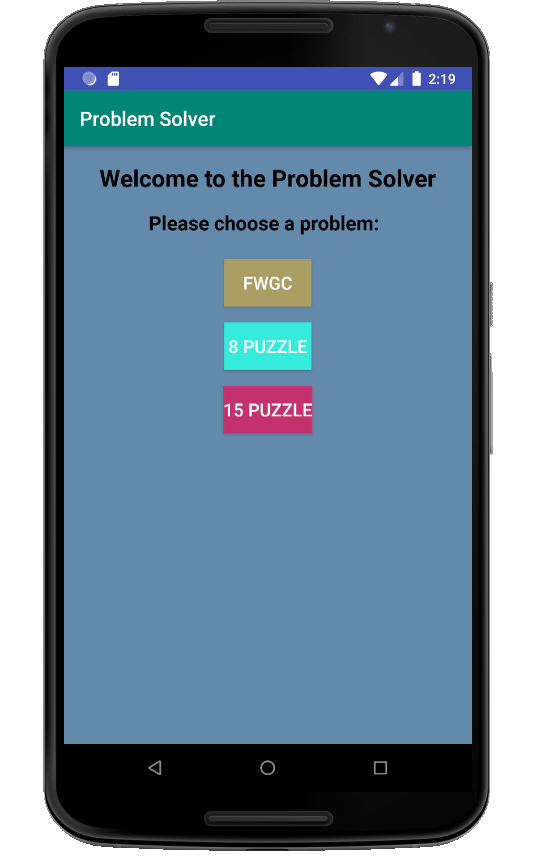
In the lab exercise you created description screens for the FWGC and
8-Puzzle problems that provided buttons for launching the problems, but
the buttons were non-responsive.
For this assignment, when the user clicks one of these buttons, a
solver screen is presented.
See the menu for layout and behavior requirements.
When the user begins a problem, a
screen is presented that includes:
- Displays of the current and goal states
- The number of moves attempted so far
- Buttons for the moves
- An area for messages to be displayed
- A button to reset the problem
- A button to automatically solve the problem
- A button to show the next move in an automatically
generated solution
- A spinner for benchmark selection (8-Puzzle only)
- An area for automated solution statistics to be
displayed
See the menu at left for examples.
Behavior requirements with examples are shown through the menu at
left.
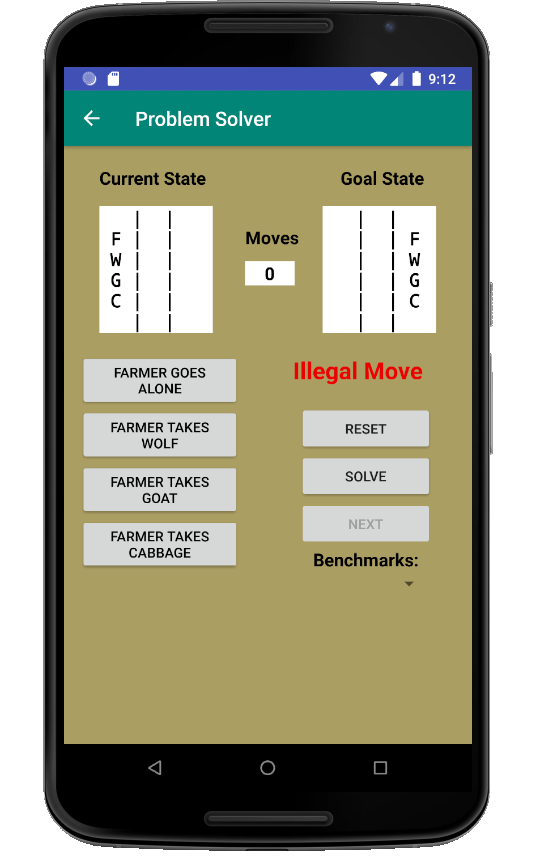
If an attempted move is illegal, an error message is
displayed.
In this FWGC example the user clicks
TAKES WOLF in
the start state.
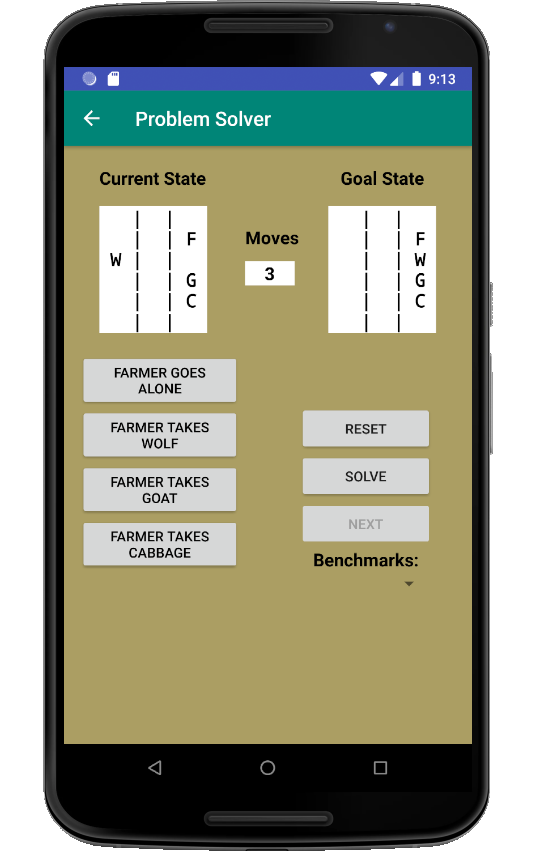
If the move is legal:
- The current state is updated and displayed
- The number of moves attempted is incremented and displayed
- Any "illegal move" messages are cleared
Below is the FWGC problem after several legal moves.
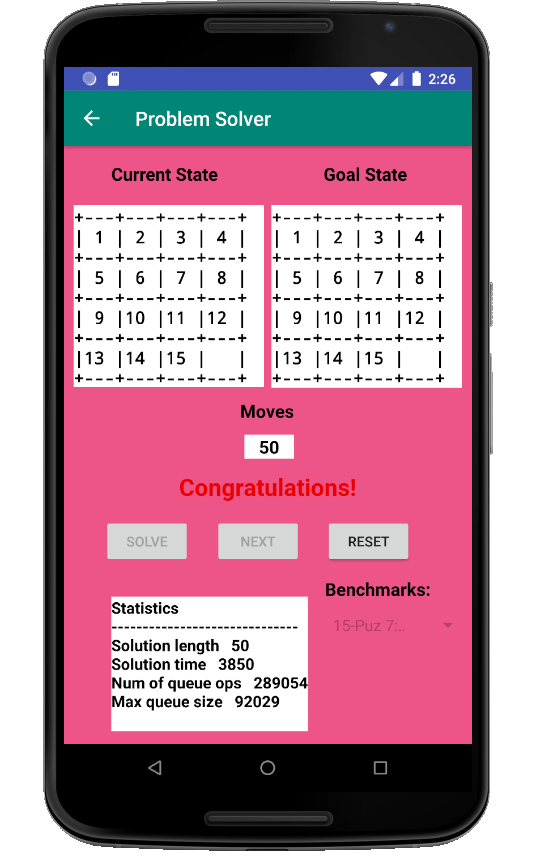
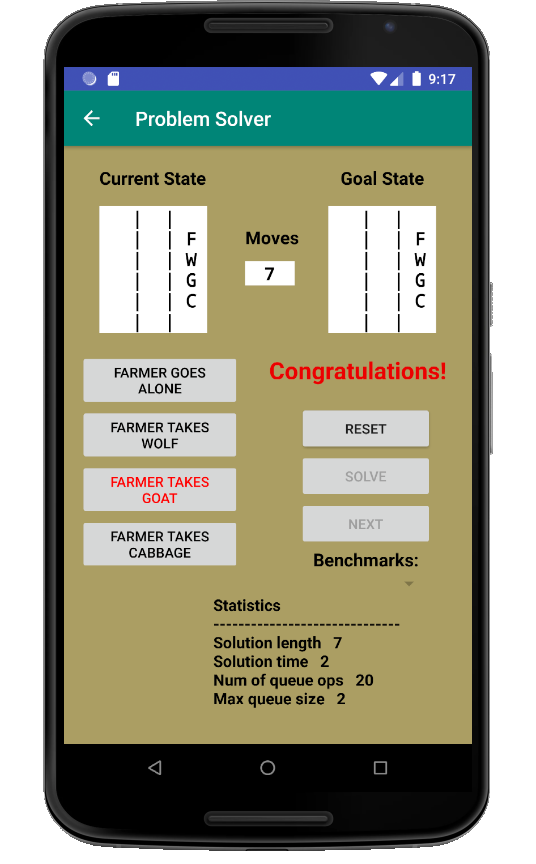
If the user solves the problem, a congratulatory message
is displayed as shown below.
If the user presses the
Reset button:
- The initial state is displayed
- The move count is set to zero
- Any displayed messages are cleared
This reset behavior is possible any time during step-through of an automated
solution. In addition, any components disabled during a step-through
are re-enabled.
The
Solve button is enabled any time the user is trying to solve
the problem.
When
Solve is pressed:
- A minimum-length solution is found from the current state
- Solution statistics are displayed, at minimum:
- Solution length
- Solution time in milliseconds
- Number of queue operations during the solution
- Maximum queue size
More statistics can be displayed if your screen has space for them.
- The Solve button is disabled
- The Next button is enabled
- The move buttons are disabled
- The benchmark spinner is disabled
See the menu at left for examples.
Here the user has clicked
Solve in the start state of the FWGC
problem.
Note that although the move buttons are not dithered out,
they are indeed disabled. This appears to be an Android glitch.

Here the user has clicked
Solve in the start state of one of the
30-move benchmark problems for the 8-Puzzle.
While stepping through a solution, the
Solve and move buttons
remain disabled, and the solution statistics remain visible.
Clicking
Next causes:
- The move button corresponding to the move resulting in the
next state in the solution, though disabled, is highlighted (see
examples in menu at left)
- The next state in the solution is displayed
- The move count is incremented
- The move button corresponding to the previous
state in the solution, if any, is un-highlighted
- If the displayed next state is the goal state, the
congratulatory message is displayed and the Next button is
disabled
Clicking
Reset causes:
- The same reset behavior as when the user is solving the
problem, as well as
- The solution statistics are removed
- The Next button is disabled
- The Solve button is enabled
- The move buttons are enabled
See the menu at left for examples.
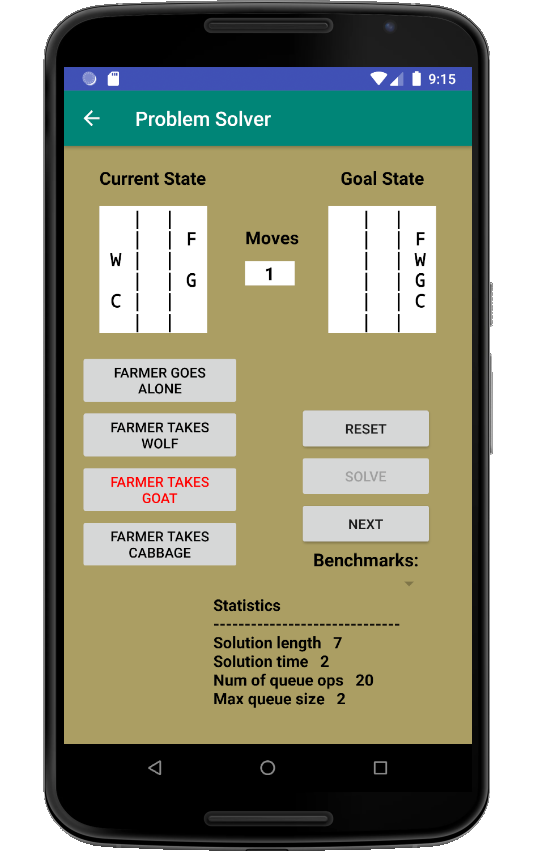
Here the user has stepped through one move in an automatically
generated solution from the start state.
Note that the
TAKES GOAT move has been highlighted.
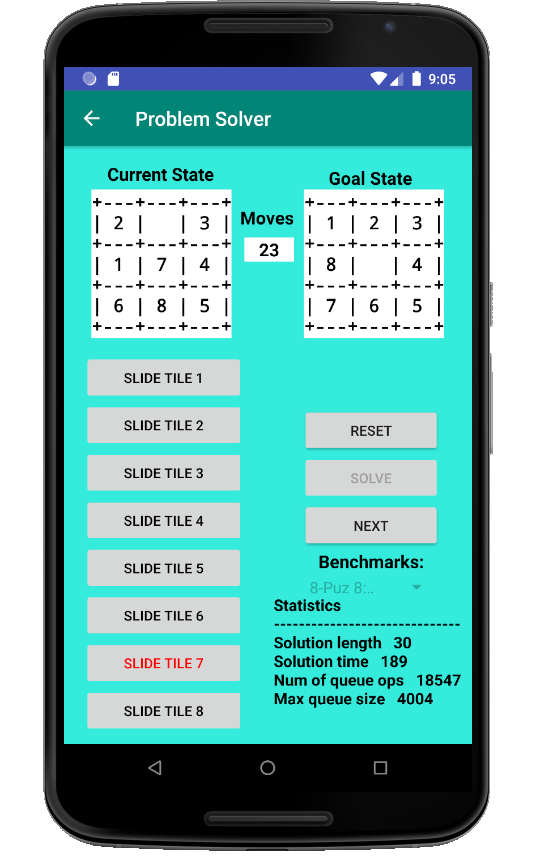
Here the user has stepped through 23 moves in an automatically
generated solution to one of the 30-move benchmark problems for the
8-Puzzle.
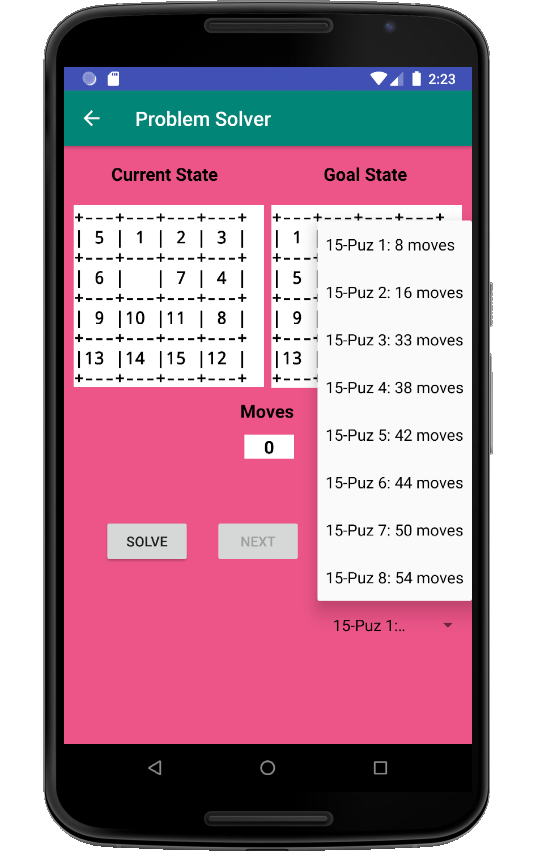
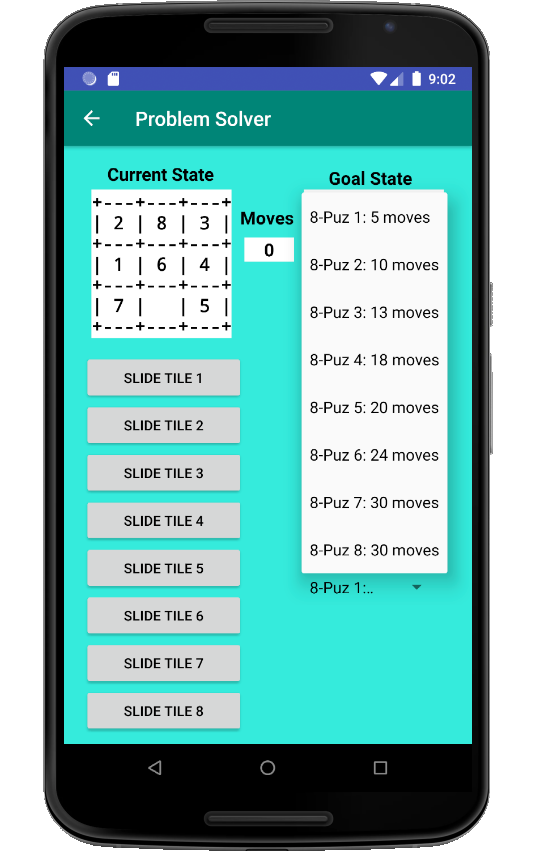
The 8-Puzzle benchmarks are the same as used for the previous
assignment (shown in menu at left).
Below is how it looks when the
Benchmarks spinner has been
clicked. When a benchmark is selected the new current state is
displayed and the move count set to zero.
This section presents screen shots following those of the Android lab
exercise.
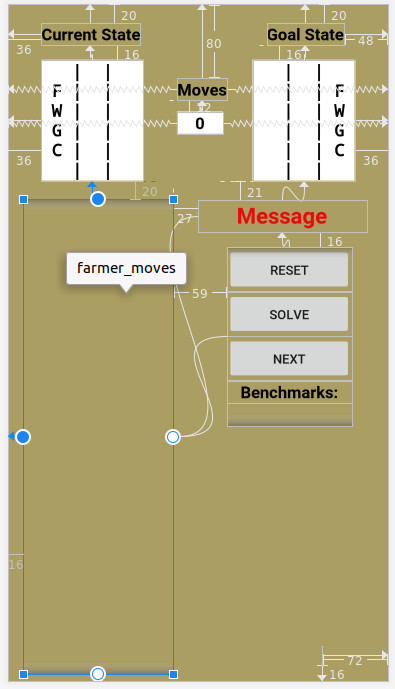
The initial solver screen for the FWGC problem is shown below. Note:
- String output is acceptable for state display
- The "Up" (upward navigation) button
 in the app bar returns the user to
the FWGC problem description screen
in the app bar returns the user to
the FWGC problem description screen
- The Next button is disabled until the user
clicks Solve
- Although there is a Benchmarks spinner, it is empty since
there are no benchmarks for this problem. You can omit the spinner
entirely for this problem if you want.
- The Statistics area is shown only when the user
clicks Solve (described later)

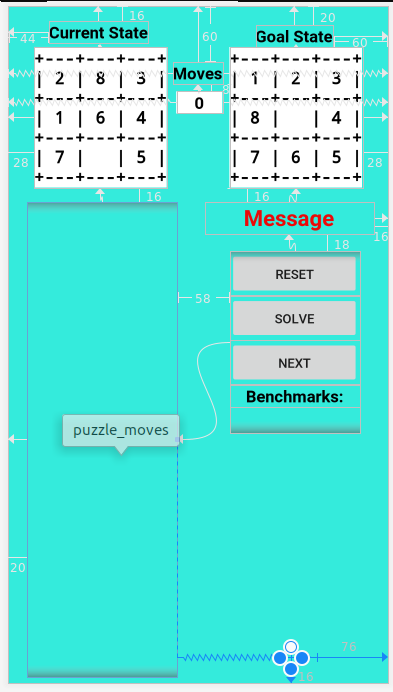
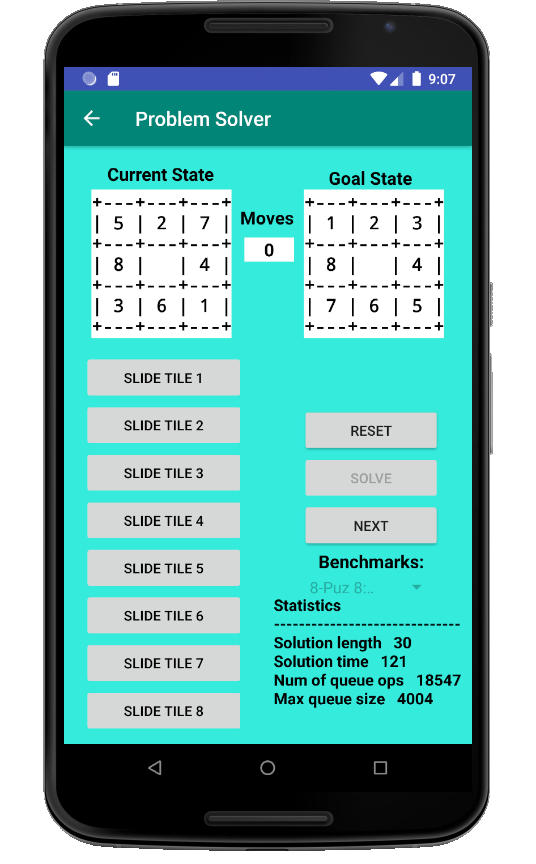
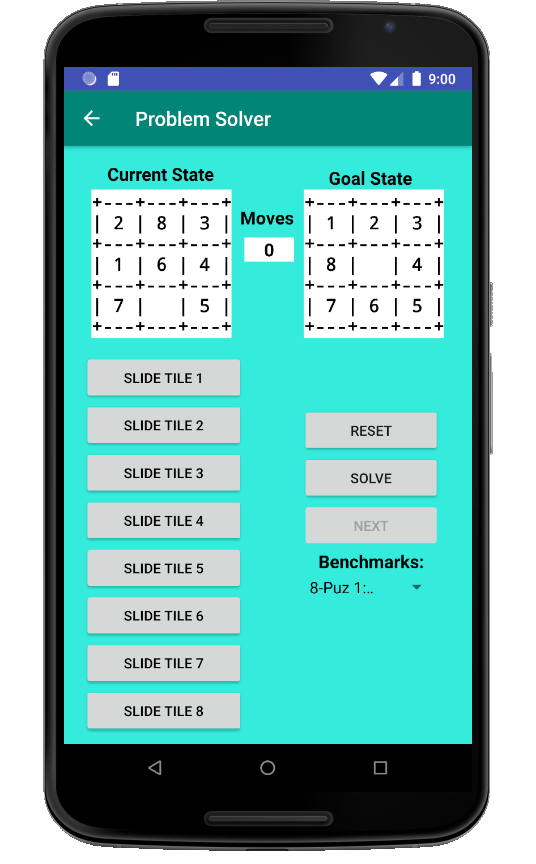
The initial solver screen for the 8-Puzzle problem is shown
below. The
Benchmarks spinner is described later.
This section offers suggestions for screen layout and implementing the
required behavior.
The solver screens have similar structure but different content
depending on the problem. Here are two possible approaches to creating
them:
- In your JavaFX implementation of the problem solver, you provided
a ProblemGUI class in the framework that was able to take a
problem and produce a GUI specific for it.
You could take a similar approach in Android, but it would not take
advantage of Android Studio's drag-and-drop layout design
editor.
-
You could create both solver screens in their entirety using Studio's
editor. However:
- There would be duplication of effort in the two similar
screens (and what if more problems are added?), and
- Giving move buttons behavior would be tedious; each button
would need its own "onClick" method in the corresponding
activity class
- You would not take full advantage of your Java framework
An alternative is a "hybrid" approach that uses Studio's editor to
create the top-level designs of the solver screens but includes
containers that can be populated by Java code.
The menu at left shows layouts created with Studio's editor. There is
some layout duplication, but there are aspects that are incomplete:
- Instead of move buttons, there is a
vertical LinearLayout. It is left to Java code to create the
buttons and give them behavior.
- Although there is a "Benchmarks:" label, it is left to
Java code to create the spinner, give it options, and listen for
option selections.
We leave these responsibilities to Java code because we
have
FarmerProblem and
PuzzleProblem classes that
facilitate them.
You should read through these suggestions in their entirety before
beginning to code.
The suggestions end with hints regarding code organization and
testing.
Giving Android buttons and spinners behavior is done with Java (or
Kotlin) code. We want to take full advantage of the Java problem
solving framework that we already have.
Each of our solver screens has its own activity class that has code
that responds to screen events and updates screen content.
For example, your activity classes might be
FarmerSolveActivity
and
PuzzleSolveActivity:
- Each of these classes has a required onCreate method in which
you can put code that fills in the layouts with move buttons and gives
them behavior
- You can get the button names from your FarmerMover
ands PuzzleMover classes
- You can get string representations of states from
your FarmerState and PuzzleState classes
- All problem information is encapsulated in objects of
type Problem, so your FarmerSolveActivity
and PuzzleSolveActivity classes should create instances
of FarmerProblem and PuzzleProblem, respectively, in
their onCreate methods
This requires you to reuse packages from your NetBeans JavaFX project.
In order to use problems, movers, and states,
you should port the following packages from your JavaFX project to your
Android app:
- framework.problem
- domains.farmer
- domains.puzzle
although you can omit
the console and GUI classes, which depend on JavaFX.
For automated solutions, you will also
need:
- framework.graph (needed for the Vertex class)
- framework.solution (see more about
the SolvingAssistant class in the menu at left)
Place these packages under
app > java > ...problemsolver in your project tree.
You will have to change the package statements in your
.java files
from, for example,
to something like:
depending on the domain you chose when you created the project.
The
SolvingAssistant class took advantage of a
JavaFX
problemSolved property to indicate whether the problem
had been solved.
Recall that JavaFX properties are enhanced POJO (plain old Java object)
properties.
If you want to use
SolvingAssistant in Android it will have to
be modified so that
problemSolved is a POJO property. This can
be done with some relatively simple changes:
- Replace the property definition on the left with that on the right:
- In the constructor, replace this property initializer:
with:
- Remove the imports of classes from the
package javafx.beans.property
IMPORTANT: The suggestions and code samples that follow use
the FWGC problem. However, everything described here will need to be
duplicated for the 8-Puzzle problem.
Suppose your FWGC layout includes a
TextView component with
id
farmer_solve_start that holds the string representation of
the current state.
Although you can use the Studio editor and
strings.xml to
initially get text into
farmer_solve_start, as the user attempts
to solve the problem we need to get text into the component under Java
program control.
We can use the
onCreate method in
FarmerSolveActivity
(and also in
PuzzleSolveActivity with appropriate changes)
to initialize a Java object to the component:
Now we can change the text in
startView when the user attempts a
move:
- Suppose we have an instance of FarmerProblem
in problem, and problem has the new current
state
- Then use the following to update the display:
- This code will not be executed in onCreate; it must be
invoked by a button listener.
The
Button constructor, like all
View constructors,
requires an application
Context.
- Context is a superclass of Activity and includes
global information about the app's environment
- Any view created using Studio's layout editor will share the app
context
- The movesView layout in which the buttons will be placed is
already part of the app environment
- We can get the app's context from movesView (or any other
view created with the layout editor) using its getContext
method, for example:
Similar considerations apply to the
Reset button. Although it
can be created and positioned using the drag-and-drop editor, its
behavior is configured in its activity class.
Suppose the
Reset button's component id
is
farmer_reset. Then the
onCreate method will need to
include:
Clicking the
Solve button must result in an optimal solution to
the current problem.
So the
onCreate method for each activity class should:
- Create an AStarSolver object for the relevant
problem
- Use findViewById to create references to the Solve
button, Next button, and statistics display area
- Add OnClickListeners to the Solve and Next
buttons.
The
Solve button listener should:
- Use the AStarSolver to solve the problem
- Save the Solution
- Display the statistics
- Enable and disable components as described in
the Behavior Requirements
The
Next button listener should:
- Use the Solution and SolvingAssistant
to get and display the next state of the solution
- Highlight and un-highlight move buttons as described in
the Behavior Requirements
- Enable and disable components as described in
the Behavior Requirements
Unless you created the benchmark spinner component using the
drag-and-drop editor, the
onCreate method can do so with:
To give the spinner selection options:
- You need an array of strings holding the benchmark names (call
it nameArray)
- You can create nameArray
by iterating through the list obtained using the
problem's getBenchmarks method
- Then create an ArrayAdapter that uses nameArray to give
selection options to the spinner. This can be done with:
After giving
benchSpinner a listener (see menu), it can be added
to the layout using
addView.
Now give the spinner an
OnItemSelectedListener using the code below.
- Do not confuse OnItemSelectedListener
with OnItemClickedListener, which will not work
- OnItemSelectedListener is not a functional interface and
cannot be specified with a lambda expression, so an anonymous
class object must be used
- The onItemSelected method is called when a spinner item is
selected.
- The int parameter i of onItemSelected is the
index of the selected string in the string array given to
the ArrayAdapter
- The parameter i can be used along with the
problem's getBenchmarks method to change to the selected
benchmark
- The onNothingSelected method can be overridden to do
nothing
As mentioned, all steps mentioned in these suggestions must be repeated
for each of the FWGC and 8-Puzzle problems.
Rather than having nearly identical (and extensive) code in
the
onCreate methods of your
FarmerSolveActivity
and
PuzzleSolveActivity classes, some suggestions for code reuse
and incremental testing follow.
The
onCreate methods differ only in:
- Their Problem object
- Their layout (ContentView)
- The components retrieved from their layouts
The beginning of
onCreate in
FarmerSolveActivity may look
like:
while the beginning of
onCreate in
PuzzleSolveActivity
may look like:
In your JavaFX problem solver, the
framework.ui package has
a
ProblemGUI class that uses JavaFX to create GUIs given problem
objects.
Your Android problem solver could also benefit from a
ProblemGUI
class, added to its framework, that performs the processing outlined in
these suggestions.
For example,
ProblemGUI's constructor could have this structure:
Now all the work is done, not by the
onCreate methods, but by
the
ProblemGUI constructor.
The constructor would be called
in
FarmerSolveActivity's
onCreate method using:
The constructor would be called
in
PuzzleSolveActivity's
onCreate method using:
To keep your code organized and to facilitate testing,
the
ProblemGUI constructor can call private helper methods that
incrementally add functionality to the layout.
For example, the body of the constructor might call the helper methods
shown below. As their names suggest, they can be developed and tested
in the order in which they appear.
See the procedure for submitting Android projects on the menu to the
left.
Your project will be inspected, tested, and run by the lab instructor. Grading criteria:
- (10 points) Successful implementation of the layout
requirements for the two solver screens
- (20 points) Successful implementation of the behavior
requirements for both problems
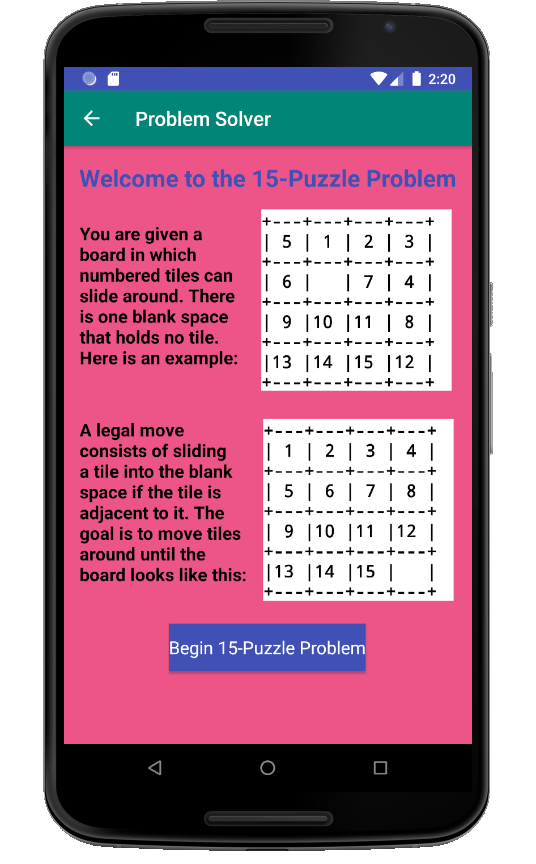
- (8 points) Extra credit: Successful implementation of the 15-Puzzle and
demonstration of all benchmarks except "15-Puz 8."