In this assignment you will extend the problem solving framework
introduced in class (see menu at left) by adding a
graphical user interface (GUI) capability. Your relationship to the
framework is therefore different than before:
- In the previous assignment (see menu), you applied the framework to the
FWGC and 8-Puzzle problems — you were a framework
user.
- In this assignment, you will augment the capabilities of the framework
itself — you will be a framework developer.
By adding a GUI to the framework's capabilities, all of the applicable
domains — dummy problem, arithmetic problem, FWGC problem, and
8-puzzle problem — benefit without modification.
The only changes you will make are to the
framework.ui package
of the
ProblemSolver project you used for the
previous assignment.
For
full credit, your job is to modify the framework so that a
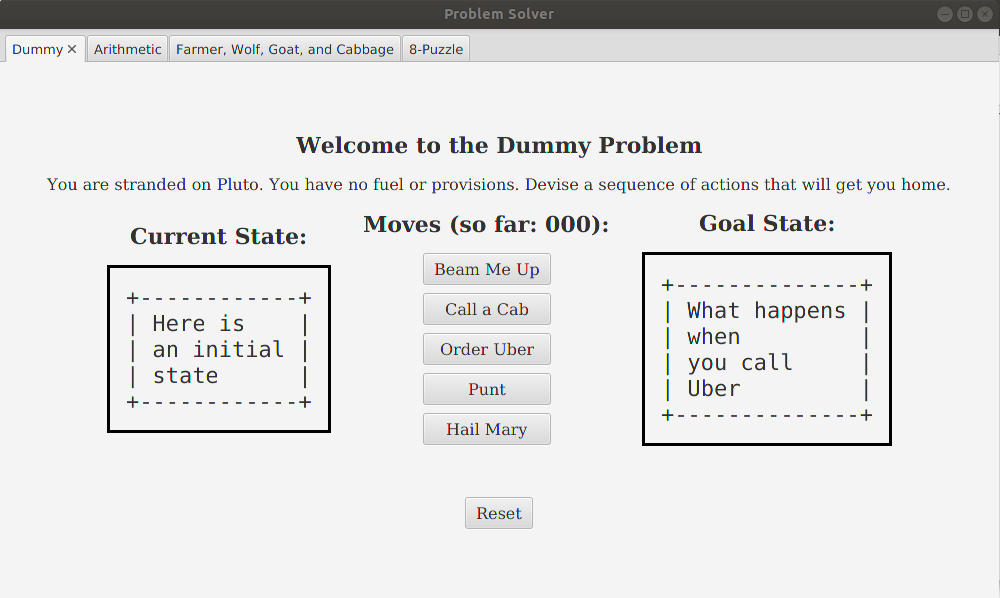
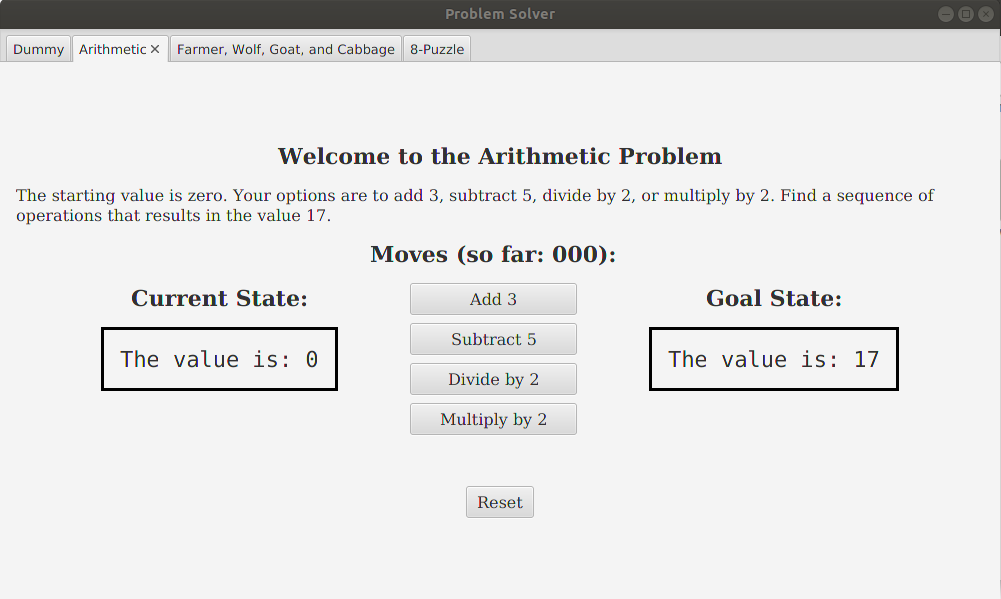
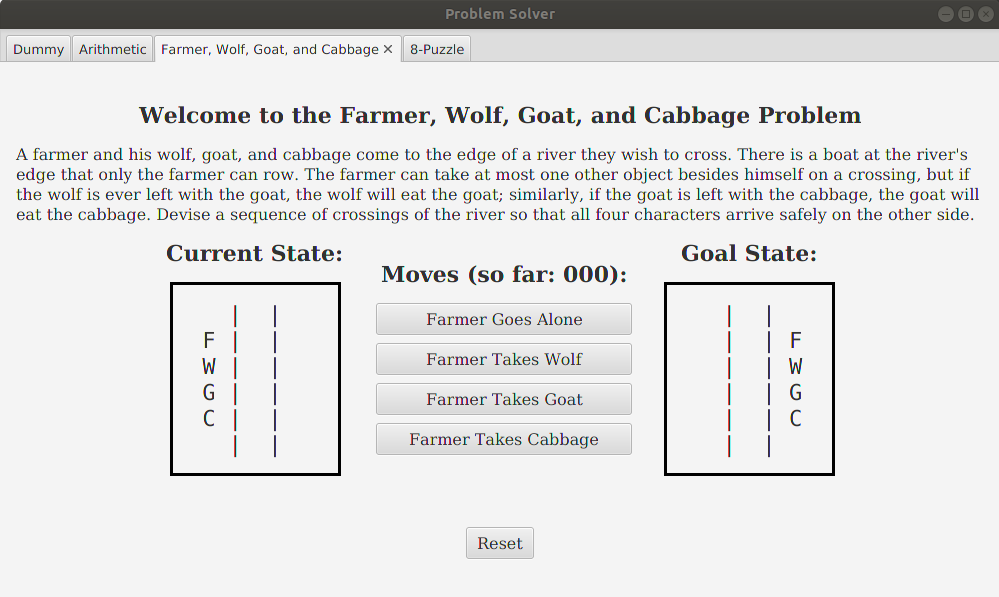
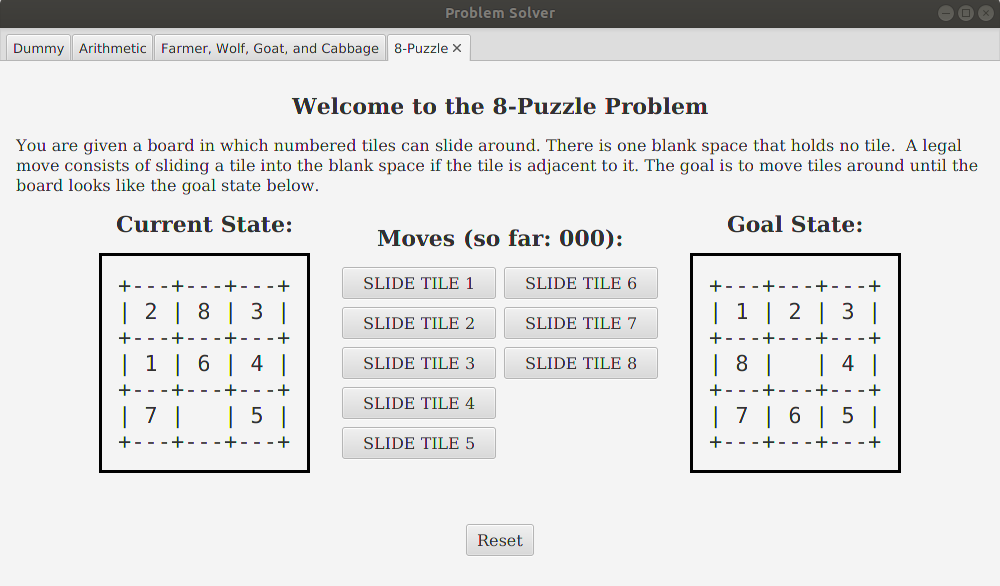
tabbed pane with the four problems is displayed, and for each problem:
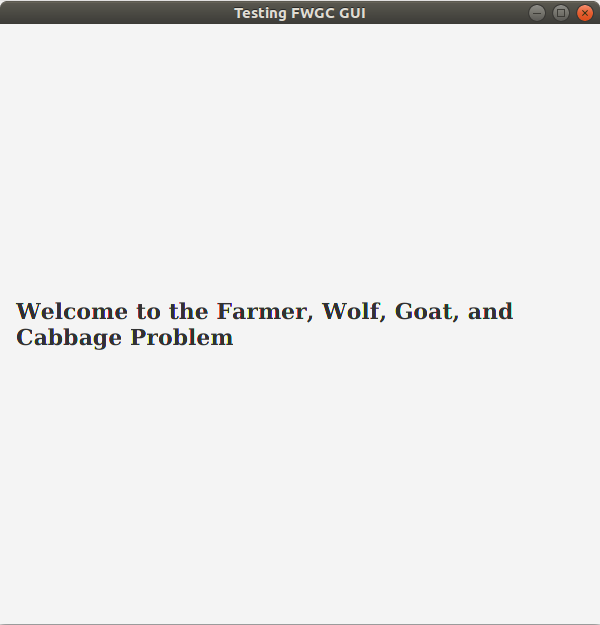
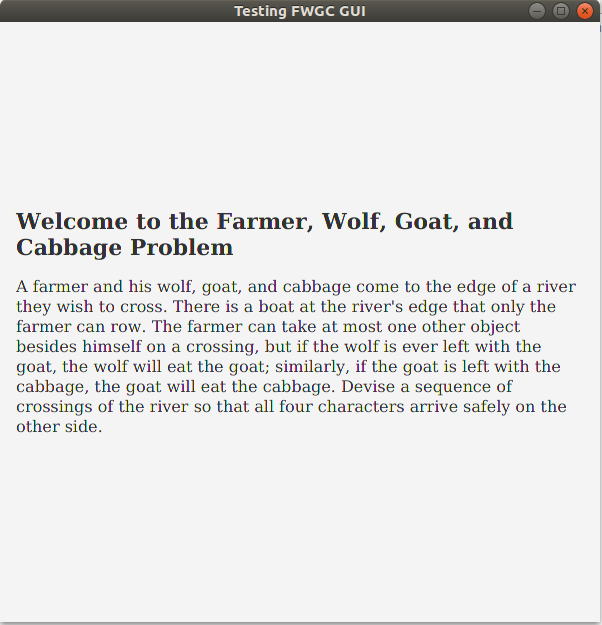
- A welcome message and description of the problem are
displayed
- The current state and final state are displayed; you can use
the State interface's toString method
- Users interact with the application by clicking buttons when
trying moves
- The number of moves attempted so far is displayed
- Messages, including invalid move and congratulations messages,
are displayed in red in the display area
- A Reset button causes the problem to reset to the initial
state and the number of moves attempted to zero
For
extra credit, you can choose either the FWGC or 8-Puzzle problem
and present state displays using color graphics and animation.
Snapshots of examples of the four applications are shown in the menu to
the left.
Note: Your job is not to copy the examples presented here exactly. In
fact, you are encouraged to do a better job of choosing and styling
your components.
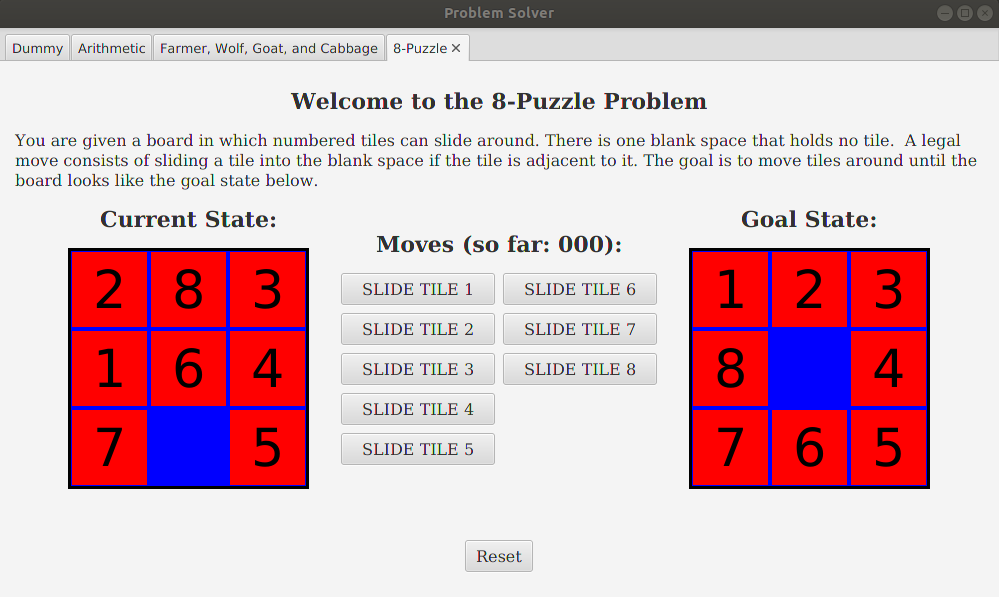
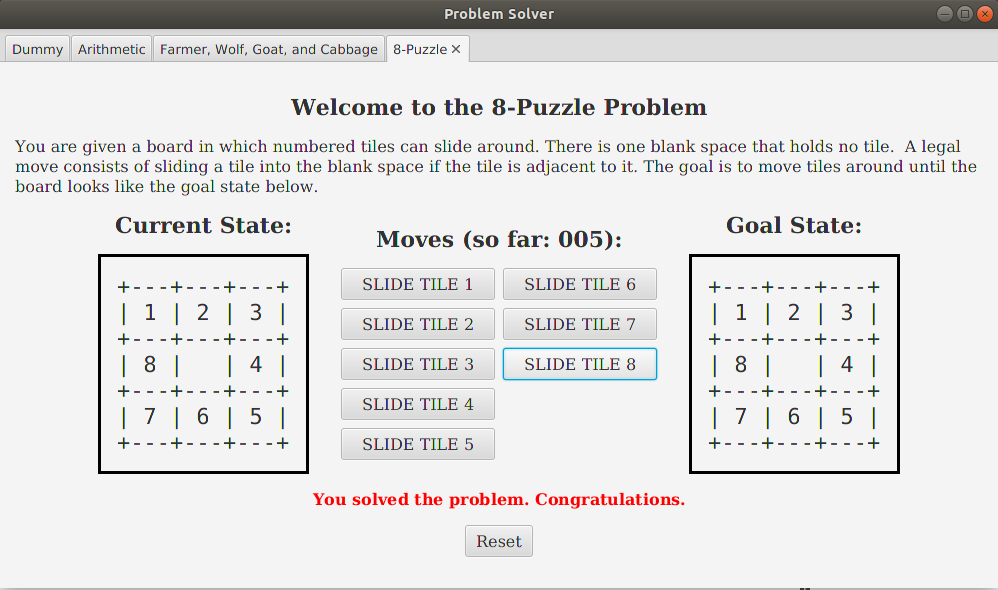
This section shows snapshots of the GUIs for each of the four problem
applications.
Also shown are snapshots showing illegal move and congratulations
messages.
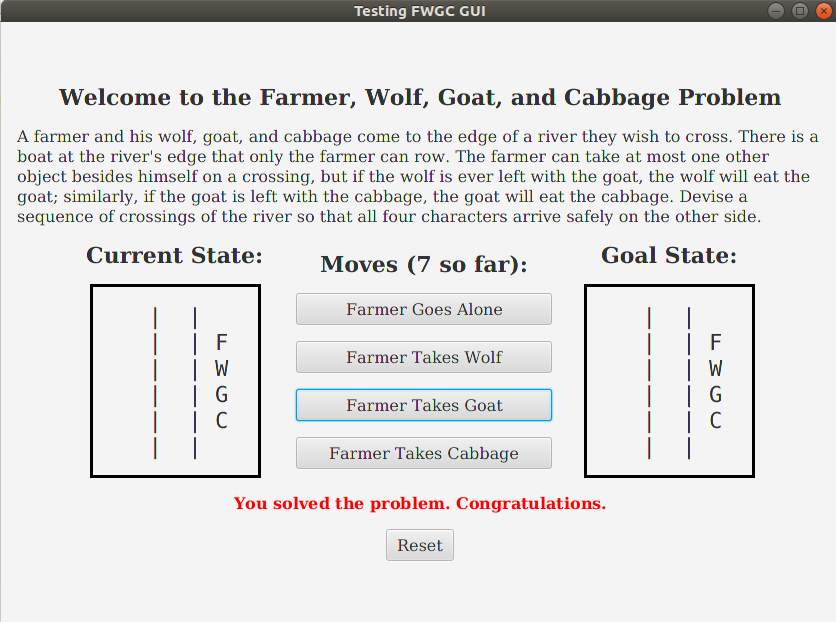
Here the farmer has attempted to cross with the wolf from the initial
state.

Here the 8-puzzle has just been solved.
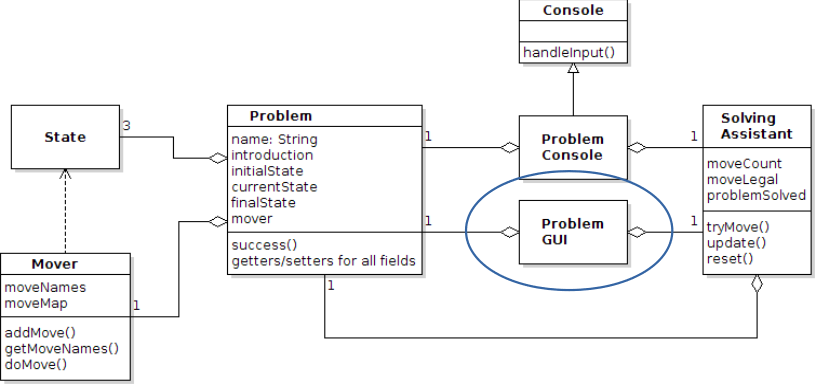
Recall the structure of the top-level problem-solving framework below:
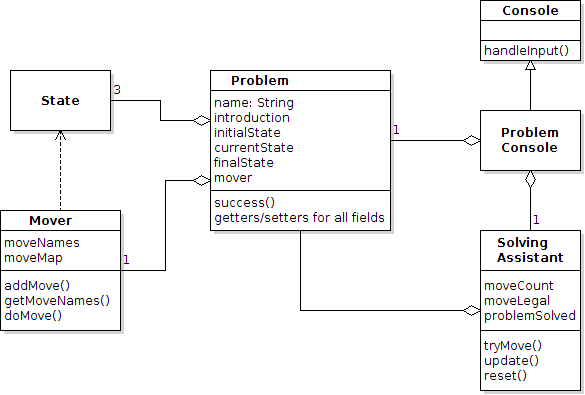
You need to add a new concrete class,
ProblemGUI, whose role is
the same as
ProblemConsole, as shown below.
ProblemGUI's only function is to present a GUI for a particular
problem.
Gathering multiple GUIs in a tabbed pane will come at a later step.
First, add a new class,
ProblemGUI.java, to
the
framework.ui package in your
ProblemSolver project.
Like
ProblemConsole, the
ProblemGUI constructor should
accept a
Problem object and a width and height for the GUI's
display area.
You can decide how to layout your GUI, whether with
a
BorderPane,
HBox/VBox,
GridPane, etc.
Whatever you decide, you should proceed by:
- Adding one component or component group,
- Testing by eyeballing the display, and
- Continuing only when the layout is correct
Suppose you layout using a
VBox. Then one approach is to
make
ProblemGUI a subclass of
VBox as shown below.
Now
ProblemGUI can be tested in a way similar to
how
ProblemConsole was tested. For example, to test it on the
FWGC problem, modify the
FarmerProblemTest class as shown
below.
Note that the scene is given a
ProblemGUI object instead
of a
ProblemConsole object, and the display dimensions
are slightly different.
Now add components to your GUI in incremental steps, starting with the
welcome message, which can be constructed using the
getName
method in the
Problem class.
Textual components can be represented using the
Label class in
the
javafx.scene.control package.
Once you've created the component, add it to the layout container (in
this case
VBox) as shown here:
Now run (test) the
FarmerProblemTest.java file as shown in "
Setting Up."
The result should look like:
Now add the problem's introduction, which also can be obtained from
the
Problem class:
The new result should look like:
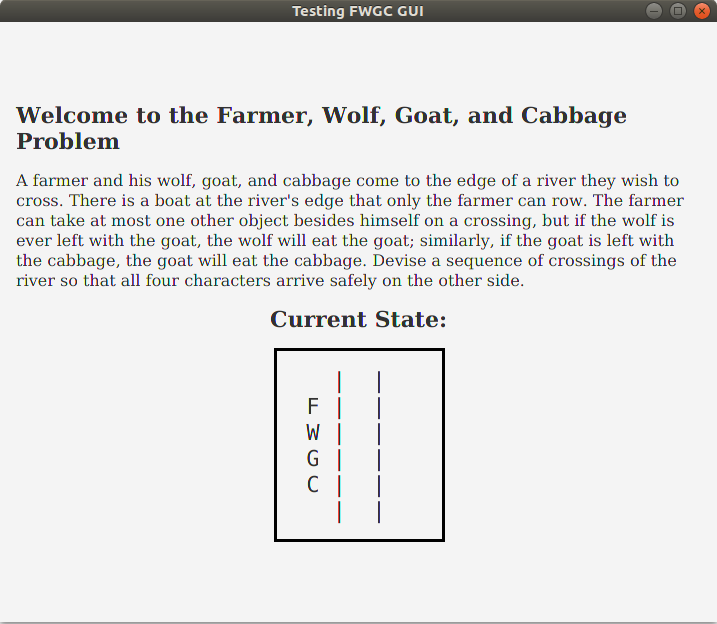
For the next step, obtain the display shown below. Note:
- This layout requires an inner layout container within the outer
one
- Since the goal state will be displayed in the same way, the work
should be done by a method that can be called again
- Since states are displayed using the State.toString
method, a Label component is appropriate:
- Use the setBorder method to outline the text
- Use the setPadding method to create space between the
text and border
- Use the setFont method to control the face and size
of the font. To line up correctly, the characters should be
rendered in a monospaced font. One example is "DejaVu Sans
Mono".
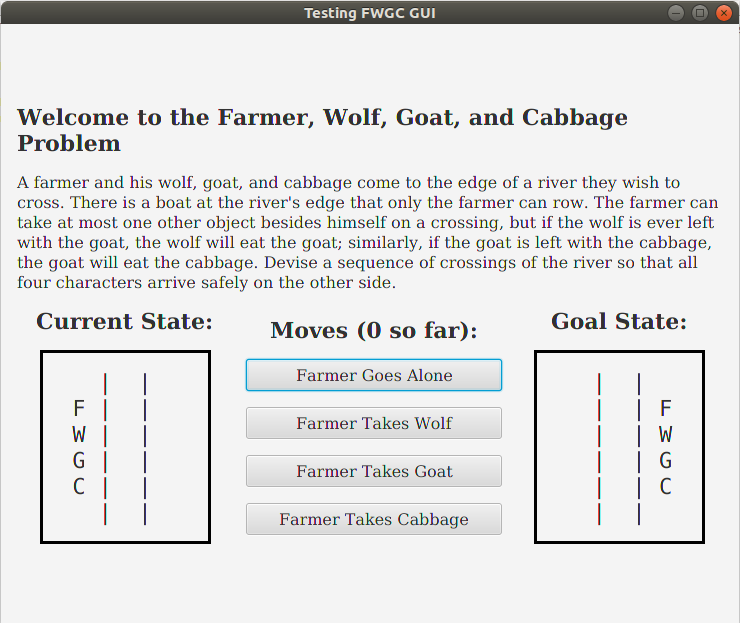
Now obtain the display shown below. Note:
- This layout requires a horizontal inner layout container which
itself contains a vertical layout of Button components.
- The button labels can be obtained from the Mover
class's getMoveNames method. The Mover object is
contained in the Problem object.
- The buttons are given behavior with the setOnAction
method, which accepts a lambda expression.
- The button action needs to try the move associated with the
button. The SolvingAssistant object is useful for
this:
- Look at the ProblemConsole class and how it makes use
of a SolvingAssistant in its handleInput
method.
- The SolvingAssistant object is useful for other parts
of the GUI, including getting the move count, checking for
whether the problem is solved, and resetting.
- When you have correctly completed this step, clicking on a valid
move button should cause an update in the state display.
Finally, obtain the display below, which shows the congratulatory
message and reset button.
- The message can be represented by the Text class in
the javafx.scene.text package
- Since a Text is a Shape, its color can be
controlled using the setFill method
- The reset button's behavior is facilitated using
the SolvingAssistant object
The top-level control should be a
TabPane, from
package
javafx.scene.control.
To create your final tabbed pane application, add the
class
ProblemTabPane to your
framework.ui source
package by right clicking the package and selecting
New >
Java Class...
- Replace the contents with
the ProblemTabPane.java file shown in the menu at
left
- This class extends TabPane. Note the addTab
method that accepts a ProblemGUI object
To use
ProblemTabPane.java, create a test class for it by
right clicking it and selecting
Tools > Create/Update
Tests.
- Replace the contents of ProblemTabPaneTest.java
with that shown in the menu at left
- Add code where indicated
- Launch the application by running
(testing) the ProblemTabPaneTest.java file.
Here are suggested changes to the framework to accommodate graphics:
- Add a ProblemCanvas interface to
the framework.ui package that has a
single update(State) method whose purpose is to
update the graphical display of the current state to that of
the state given as a parameter.
- Add a second ProblemGUI constructor that accepts, in addition to
the three original parameters of the first constructor, two
ProblemCanvas parameters representing the current and goal
states of the problem. When this constructor is called, the GUI
uses the canvas objects instead of the string-based labels for
state display.
- When the user makes a move, if the GUI contains canvas objects,
call the current state canvas's update method with the new
state to update the display.
The framework changes are shown in the class diagram below. Also shown
is an implementation of the
ProblemCanvas interface,
namely a
PuzzleCanvas class, to accomplish graphics display of
the 8-puzzle, discussed next.
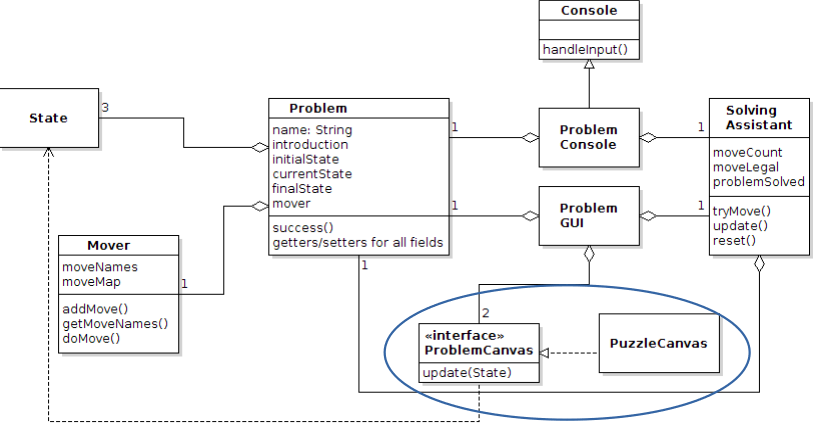
A class implementing
ProblemCanvas, such as
PuzzleCanvas,
must depict the current state of the problem graphically. To accomplish
this,
- PuzzleCanvas should extend a suitable layout container,
such as Pane, in javafx.scene.layout, that allows
absolute positioning of components.
- The PuzzleCanvas constructor should accept
a PuzzleState parameter representing the initial state
- The PuzzleCanvas update method updates the
graphical display to the state passed in as an argument
Refer to the Java 8 Lab Exercise (see menu) for how to implement
graphics and effect animations.
When your
ProblemTabPaneTest.java file runs correctly:
- Make sure your identifying information is in the class comments
of all your files
- Export your ProblemSolver project folder to
ProblemSolver.zip.
- Submit ProblemSolver.zip by going to
and clicking Submission under Assignment:
Graphical User Interfaces.
Note the general
Submission Policy in the menu at left.
Your project will be inspected, tested, and run by the lab instructor. Grading criteria:
- (25 points) Successful introduction of
the ProblemGUI class into the framework and successful
execution of the ProblemTabPaneTest class displaying the four
problems (Dummy, Arithmetic, FWGC, and 8-Puzzle).
- (5 points) Adequate documentation of ProblemGUI.
- (8 points) Extra credit: Graphical representation of
either the FWGC or 8-Puzzle problem with animation.