An
app is a collection of
activities,
layouts,
and
resources.
Top-level work flow to create an app:
- Create a project
- Add GUI components to a layout using XML
- "Wire" the layout to an activity through Java code,
giving the app behavior
- Customize the app's appearance through resources using
styles, colors, and strings
| android.view.View: |
Basic building block for UI components. A View occupies a
rectangular area on the screen and is responsible for drawing and
event handling. |
| android.widget.TextView: |
Displays text. TextView is a subclass
of View. |
| android.widget.EditText: |
Displays editable text. EditText is a subclass
of TextView. |
| android.widget.Button: |
A push-button widget that can cause an action when clicked or
pressed. Button is a subclass of TextView. |
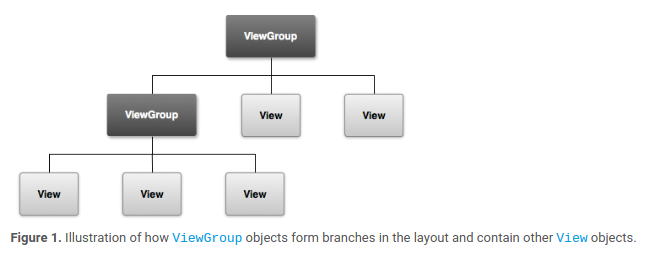
| android.view.ViewGroup: |
An invisible view container that defines how child elements are
laid out. A ViewGroup is also a View, allowing
groups to contain other groups. |
| android.widget.LinearLayout: |
A layout whose components are displayed in either a vertical or
horizontal orientation.
LinearLayout is a subclass of ViewGroup. |
| android.widget.RelativeLayout: |
A layout whose components are displayed relative to each
other. RelativeLayout is a subclass of ViewGroup. |
| android.support.constraint.ConstraintLayout: |
A layout that allows you to position and size components in a
flexible way. ConstraintLayout is a subclass of ViewGroup. |
Like JavaFX components, Android components are arranged in a complex
inheritance hierarchy. Below is a small part of it.
Note that a
ViewGroup not only
extends
View, but also aggregates multiple
Views. This
design pattern allows arbitrary levels of groups within groups.

View groups are composed of views and other view groups, forming a
container hierarchy:
The example below shows some attributes that all
View components
have in common.
Note that the attribute names begin with
"
android:", to indicate that they are used with elements from
the
Android Platform.
| android:id |
Uniquely names the component for reference |
| android:text |
The display text for a component, like the label on a button |
| android:layout_width |
The component's width |
| android:layout_height |
The component's height |
This section shows examples of attributes that are used to configure
various layouts.
Some attributes specific to
ConstraintLayout are shown below.
Note that the attribute names begin with
"
app:", to indicate that they are used with elements not from
the Android Platform, but from a library, in this case
the
Constraint Library.
| app:layout_constraintLeft_toRightOf |
Value should be the id of the component whose right side
is constrained to the left side of this component |
| app:layout_constraintBottom_toBottomOf |
Value should be the id of the component whose bottom side
is constrained to the bottom side of this component, or perhaps "parent" |
Example:
In this example,
- Button B's left side is attached to button A's right side,
and
- Button B's bottom side is attached to its parent's bottom
side. In this case, the parent is the ConstraintLayout
object itself.
Some attributes specific to
RelativeLayout:
| android:layout_below |
Value should be the id of the component above this component |
| android:layout_alignParentLeft |
"true/false"; whether to align a child's left edge with
its parent's left edge |
Examples:
Some attributes specific to
LinearLayout:
| android:orientation |
Either "vertical" or "horizontal" |
Examples:
When strings are used to label parts of a GUI, they should be defined
as resources rather than hard-coded. Consider the display of
"Hello World"
in our example. Instead of:
use:
where
strings.xml looks like:
The
@ character indicates a resource is being used.
This approach allows all strings to be defined in one place, making
them easier to find and change.
It's also easier to change languages. By default, resource files are
placed in the
values folder. To use French strings instead, simply
place resource files in the
values-fr folder.
An Android
Spinner presents a drop-down menu of selectable
options. Here is a spinner for selecting beer color:
Note that the resource is an array (a string array), defined
in
strings.xml like this:
All activities are specified in
AndroidManifest.xml.
Each app runs in its own
process. When an activity is started:
- Existing processes are checked, and if a
suitable process exists it will be used, else Android creates a new
process.
- The activity's onCreate method is called. Code to set up
a new screen goes in onCreate, not in a constructor.
- onCreate must finish before the screen can appear
Every activity is represented by Java code and has an
associated
layout represented by XML code.
Activities specify actions to take when the user interacts with the
components of the layout.
For example, here is what happens when the user presses a button:
- The layout specifies a method in the activity to call in
response
- The activity method carries out Java code that implements
the application logic — make some calculations
- The activity method uses the calculations to update the user
interface
For this to happen,
- The layout must specify the method to call when the
button is pressed, and
- The associated activity must implement the method
- All activities must extend android.app.Activity (or a
subclass) and override the onCreate method. For example:
-
The onCreate method associates the activity with a layout
using the setContentView method
- R.java is auto-generated and defines constants (such
as R.layout) that refer to resources such as XML layouts, ids,
strings, etc.
If a button is involved in the activity's associated layout, the
method specified by the button's
onClick attribute is
defined in the activity class. The method must return
void
and accept one
View parameter. For example:
In order to manipulate the display, activities usually need to find
components and act on their values in some way.
For this purpose, use the
findViewById method in
the
Activity class:
(<type>) findViewById(R.id.<id>);
where
<id> is the component's id (as given by
the
android:id attribute) and
<type> is the component's
type.
For example, suppose
edit_message is the id of
an
EditText component (a text component that users can edit),
and
sendMessage is a method that wants its value:
When you create a new project, a number of folders and files are
created:
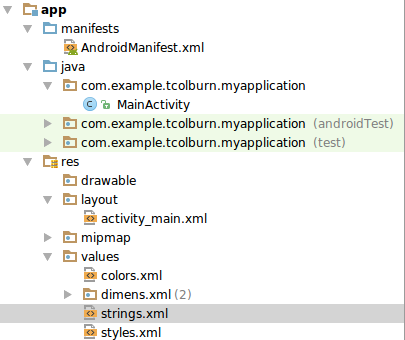
Java files are stored here:
app/src/main/java
in a package specific to your application.
Below is the default Java file
MainActivity.java. Note that it
refers to the layout
activity_main.
Layout files are in XML (see menu at left) and stored here:
app/src/main/res/layout
Below is the default layout file
activity_main.xml.
A top-level XML file in an Android project is the
Android Manifest
File, at
app/src/main/AndroidManifest.xml. Below is the
default version.
Note the use of "
@string", "
@style", and
"
@mipmap". These are examples of
resources.
Resource files are used for styling (colors, padding, etc.) and string
naming.
By specifying resources separately in files, rather than hard-coding
them in layout or code files, they can be easily changed in resource
files. Example:
- Note the use of "@style/AppTheme"
in AndroidManifest.xml. It refers to a style
named AppTheme and defined
in styles.xml
- AppTheme uses "@color" to indicate a color
resource, for example, @color/colorPrimary, defined
in colors.xml
styles.xml and
colors.xml are shown in the menu, along
with the default
strings.xml, which gives the app name.
The
mipmap resources specify icon images that identify your app
on the display's home page and launch your app when clicked. By
default, it looks like:

Most apps involve more than one activity. A chain of two or more
activities is called a
task.
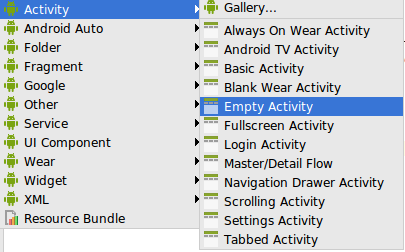
To create a new activity, right-click
app and choose
New
-> Activity -> Empty Activity, as shown below. Note:
- There are other choices for type of activity, but the empty activity is
the easiest to use for now.
- A new activity element is added
to app.src.main.AndroidManifest.xml
In this example, two activities are involved:
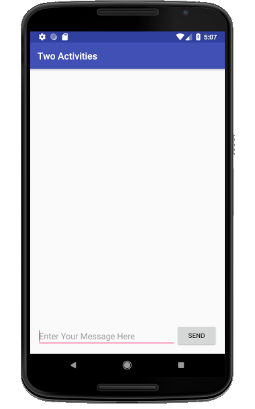
- Main activity:
- Presents a screen with a text field and SEND
button at the bottom
- The user enters text in the field and clicks the button,
launching the second activity
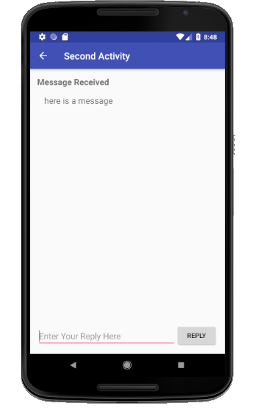
- Second activity:
- Presents a similar screen with the text
from the first activity shown at the top as a received
message
- The user provides a reply in a text field at the bottom and
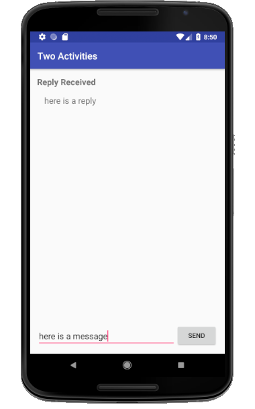
clicks a REPLY button
- The original screen is redisplayed, with the reply displayed
at the top
This section shows screenshots, layout files, and activity classes
involved with this example.
The opening screen is shown to the right with its layout file
below. Note:
- The layout is a RelativeLayout
- The EditText and Button components are placed at
the bottom using the layout_alignParentBottom attribute
- The button behavior is given with the onClick attribute,
whose value is "launchSecondActivity"
- Two TextView components are placed at the top but
rendered invisible using the visibility attribute. These
components will be used by the second activity.
- Strings used in the layout are defined in strings.xml (see
menu at left)
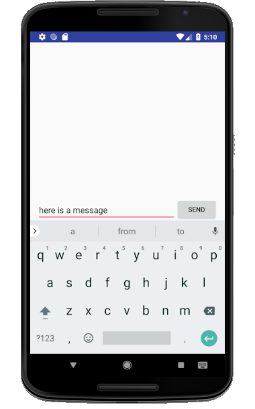
The screen shot at right shows the user putting text in
the
EditText component.
Below is the
MainActivity.java file. Note:
- The onCreate method looks up the non-button components
using findViewById, although the invisible components are
not used initially
-
The launchSecondActivity method, called when the SEND
button is clicked, calls a variation of startActivity
called startActivityForResult, which expects a result to be
sent back by the other activity
- The onActivityResult method will be called when the other
activity returns a result
The second screen is shown to the right with its layout file below.
- It labels and displays the message put into the opening
screen
- It is similar to the opening screen but uses different string
labels and makes all components visible
- Clicking the REPLY button activates the returnReply
method
The screen shot at right shows the user replying in the second screen.
Below is the
SecondActivity.java file.
- The onCreate method receives the Intent from the
main activity and displays its message
- In returnReply, the reply message is packaged in
an Intent and sent back to the main activity using
the setResult method
- The life cycle of the second activity is completed using
the finish method
The screen shot at right shows the screen after the second activity has
replied.
Below we show again
MainActivity.java:
- The onActivityResult method is called, with the reply
message displayed using the TextView components that were
originally invisible
Blah
When you want an activity to start a second activity, you use
an
Intent object (from package
android.content), a type of
message that binds activities at run-time:
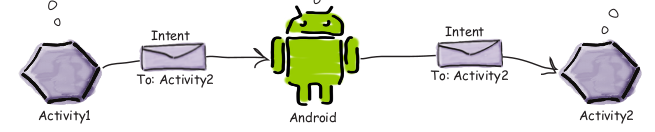
Here is the basic form of code to start another activity:
where
TargetActivity is the new activity's class type.
Suppose the
sendMessage method in our example wants to start a
new activity that receives a message string along with an intent.
To pass information to an activity along with an intent,
use
putExtra:
intent.putExtra(<key>, <value>);
where
<key> is a unique string name
and
<value> can be one of several common types.
Calling
putExtra is like adding to a hash table that will be
sent along with the intent.
In the example below:
- The second activity is a DisplayMessageActivity
- The text from an editable component, retrieved
using findViewById, is being sent to the second
activity
- The key string for putExtra uses domain information to
make it likely to be unique
- The key string is public so it can be used by the
receiving activity
To get information from an intent, the receiving
activity's
onCreate method can use
the
get<Type>Extra method in the
Intent class:
- <Type> can be one of several allowed types,
including String, Int, and Double, that matches
the type of the object added to the intent with putExtra
- get<Type>Extra is given the same key given
to putExtra
In our example, the
DisplayMessageActivity
class's
onCreate method would look like that below. Note that
the key used for
getStringExtra is the constant string defined
in the original activity.
The information received in intents is often used to create a new
display.
In our example, the
MainActivity object:
- Gets a string from an EditText component in its
layout, then
- Sends the string, by way of an Intent, to
a DisplayMessageActivity object
The
DisplayMessageActivity object wants to display the string in
its
own layout. It must:
- Create a suitable GUI component out of the received string,
and
- Add the component to its layout
When a new empty activity is created, it is given a default layout.
The default layout for
DisplayMessageActivity is
in
activity_display_message.xml, shown below. Note that it does
not contain any children.
When the
DisplayMessageActivity object is created, it:
- Gets the message string from the intent
- Creates a TextView component from the message string
- Retrieves the default layout using findViewById
- Adds the component to the layout
Android Studio provides debugging aids similar to those provided by
NetBeans.
This section introduces the Android Studio debugger using a simple
calculator app that looks like that shown below.
There is one layout file,
activity_main.xml, and two Java
files,
MainActivity.java and
Calculator.java, shown in
the menu at left under
Files.
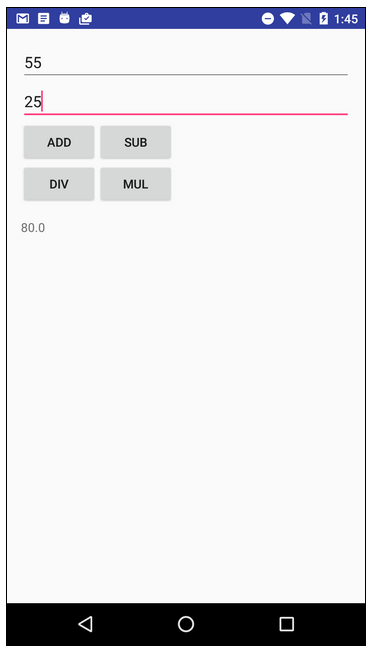
The app works well except when either operand is missing:

Select
Run > Debug 'app'. If the app is already running, it
will be restarted.
You can now set breakpoints by clicking in the left gutter of the
editor window next to the line numbers. For example, here is a
breakpoint on line 102 of
MainActivity.java:
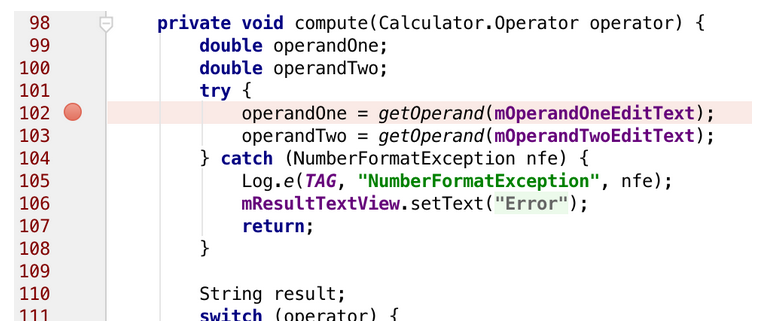
Now when you enter operands and choose an operation, execution will
stop at line 102.
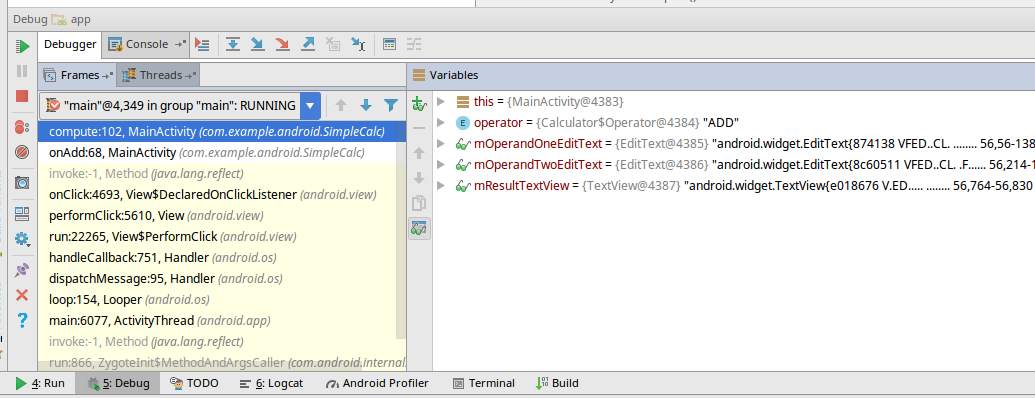
When a breakpoint is reached, execution stops and the Debug window (see
below) shows the current state of your app.
When a breakpoint is reached, you can then "step" through execution using:
- Step Over:
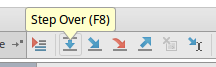 The debugger executes the current line and moves to
the next line in the current method. If the current line has a
method call, it jumps "over" the call.
The debugger executes the current line and moves to
the next line in the current method. If the current line has a
method call, it jumps "over" the call.
- Step Into:
 The debugger jumps "into" the execution of a method call. The Frames
panel shows a new method invocation on the call stack.
The debugger jumps "into" the execution of a method call. The Frames
panel shows a new method invocation on the call stack.
- Step Out:
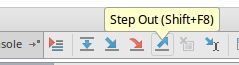 The debugger executes the remainder of the current method and pops
back "out" to where the method was called.
The debugger executes the remainder of the current method and pops
back "out" to where the method was called.
You can also:
- Resume:
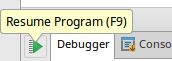 Execute the app until another breakpoint.
- Mute Breakpoints:
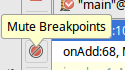 Disable breakpoints without removing them from the code.
- View Breakpoints:
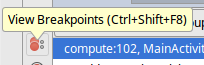 Display a breakpoints window that allows you to view,
enable/disable, and add additional features of breakpoints
including conditions, dependencies, and logging.
Display a breakpoints window that allows you to view,
enable/disable, and add additional features of breakpoints
including conditions, dependencies, and logging.
There are many other features of the debugger, including:
- If your app is already running on a device or emulator, and you
decide you want to debug that app, you can switch an already running
app to debug mode.
- You can examine and modify variables during execution.
The Variables panel updates to reflect the new execution state,
and the current values of variables also appears after each line of
your source code in italics.
- When you step into a method, the Frames panel updates to
indicate the new frame in the call stack.
- You can create conditional breakpoints, enabled only when a
given condition is true.
- You can enter and execute any code using Evaluate Expression.
Files for the simple calculator app.
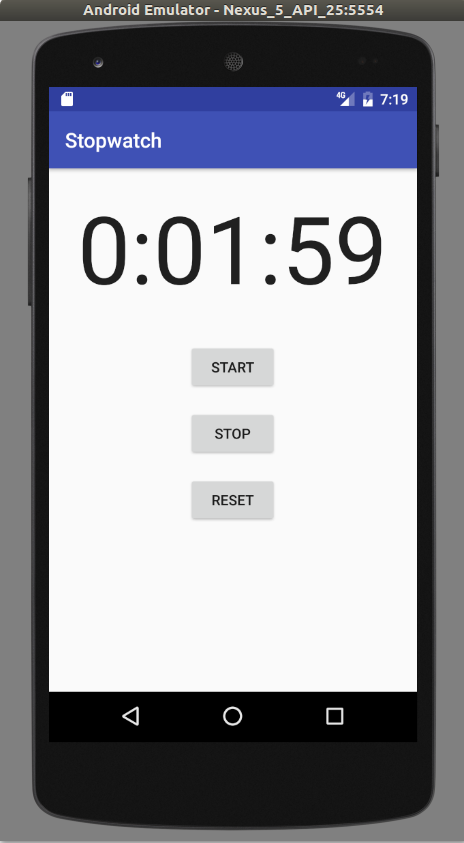
In this section we present an app that displays a simple stopwatch, as
shown below.
The stopwatch shows seconds, minutes, and hours as they elapse.
The user may
start,
stop (pause), and
reset the
stopwatch.
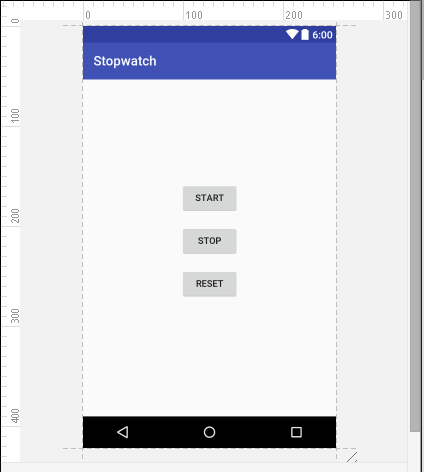
The stopwatch layout is accomplished with a single text view used to
display the timer, and three buttons to control the stopwatch, all
within a
RelativeLayout.
Note the use of these attributes beyond those we've already seen:
| android:layout_width, android:layout_height |
values "match_parent" (make the dimensions of this
component match those of its container) and
"wrap_content" (make the dimensions of this component be
just large enough to hold the conent) |
| android:paddingBottom, android:paddingLeft, etc |
values
are given in pixel densities, for example, "16dp", so that
paddings are adjusted for devices of varying resolutions |
| android:layout_marginTop |
spacing between a component and
whatever is above it, also given in pixel
density. (Also android:layout_marginBottom, etc.) |
| android:layout_alignParentTop |
whether to align the
component with its container's top ("true/false").
(Also android:layout_alignParentBottom, etc.) |
| android:layout_centerHorizontal |
whether to center a component
horizontally in its container
("true/false"). (Also android:layout_centerVertical.) |
| android:layout_below |
value is the id of a component to place this component below in
a relative layout. (Also android:layout_above, etc.) |
| android:textAppearance, android:textSize |
values to make the timer font large |
The button labels are specified using the
android:text
attribute.
The attribute values are given using "
@string/<name>",
where
<name> is defined in
res/values/string.xml:
Here is the preview presented by Android Studio for this layout:
The stopwatch will be updated by a method called
runTimer:
- runTimer will check whether the stopwatch is running,
increment the number of seconds and display the number of
seconds in the text view.
- runTimer will need the variables seconds, to count
seconds, and running, to hold whether the stopwatch is
running
The layout specifies the methods
onClickStart,
onClickStop,
and
onClickReset to be called when the various buttons are clicked.
These methods use the
seconds and
running variables, as
shown here (the
runTimer method is not shown yet):
The
runTimer method needs to:
- Compute the hours, minutes, and seconds from the seconds
variable
- Format the display string and update the stopwatch's text
view
- Increment seconds if running is true
- Repeat this process every second
The code below shows this, without the repetition:
The
runTimer code must keep looping so that it increments
the
seconds variable and updates the text view every second.
In non-Android Java programs, you can perform tasks like this using a
background thread.
However, only the main Android thread can update the user interface; if
any other thread tries to do so an exception is thrown.
The solution is to use a
Handler: An Android class you can use
to schedule code that should be run at some point in the future, or
that needs to run on a different thread.
To use a
Handler, wrap the code you wish to schedule in
a
Runnable object, then use the
post
and
postDelayed methods to specify when you want the code to
run.
- post: posts code that needs to be run as soon as
possible. Takes one parameter, a Runnable:
- postDelayed: posts code that should be run in the
future. Takes two parameters: a Runnable and a long,
in milliseconds:
The new code for
runTimer:
- Creates a Handler
- Implements a Runnable that delays itself by 1000
milliseconds (one second)
- Schedules the Runnable for immediate execution
The
StopwatchActivity class below will produce the desired
behavior.
Note that the call to
runTimer is placed in the
activity's
onCreate method so that the
run method (but
not the stopwatch itself) starts running immediately.
The
Android Developer Fundamentals Course has many exercises, called
"codelabs." There are many more topics, including:
- Debugging
- Unit testing
- GUI components including input controls, pickers, menus, and
tabs
- Using graphics, styles, and themes
- Working in the background
- Saving user data