So far we have learned just enough about the Document Object Model
(DOM) to facilitate testing our JavaScript problem solver.
We have used the DOM and some basic HTML elements to
display the results of JavaScript test calls in
simple dynamically created web pages.
Now we will exploit the DOM and Cascading Style Sheets (CSS) to create
a full graphical user interface (GUI) for our problem solver, as shown
below.
We have already used these aspects of the DOM to display results of
testing our JavaScript problem solver code:
- DOM objects representing HTML elements:
- div: for content covering multiple lines in a web
page
- textarea: to display strings formatted with newline
characters
- br: to start a new line
- span: for textual content spanning characters on a
single line
- canvas: for drawing graphics in a web page (currently
used only for rendering text)
- Identifying HTML elements to the DOM using
the id="..." HTML attribute
- DOM document and object methods:
- document.createElement(...): for creating new DOM
elements
- document.getElementById(...): for retrieving DOM HTML
objects by id
- appendChild(...): for giving content to a DOM
element such as div
- DOM object properties:
- innerHTML: for giving textual content to a DOM
element such as div
- value: for giving content to a DOM element
such as textarea or input
- style: for styling a DOM element such
as span
While the DOM allows us to
access the parts of a displayed web
page, CSS (
Cascading Style Sheets) provides a language
for
styling a web page's presentation.
This involves:
- Laying out the content in a specified form, including
position, alignment, and size of page elements
- Specifying features of the font used for text
- Giving foreground and background colors for page elements
- Specifying borders, margins, and padding for page
elements
- Etc.
CSS strictly separates web page data from its presentation and
therefore employs the
Model-View-Controller design pattern.
The fundamental component of CSS is a
declaration, given by a
property/value pair. For example, in this declaration:
width: 700px
the property is "
width" and the value is
"
700px". Multiple declarations can be separated with semicolons:
width: 700px; height: 600px
See
Tutorial on the menu to the left for a link to the W3
Schools CSS Tutorial.
Here are the declarations used to style the JavaScript FWGC problem
solver that opened this section:
        width: 700px;
        height: 600px;
        border: 5px solid gray;
        padding: 10px;
        margin: 10px;
        background-color: LightBlue;
        position: absolute;
The
border property specifies features of any border drawn
around an element, in this case width (5px), style (solid), and color
(gray).
The
padding property specifies the space around elements
inside
of any border surrounding it.
The
margin property specifies the space around elements
outside
of any border.
This section describes how to use CSS in HTML in three general ways:
- Directly styling individual elements using the style
attribute
- Creating style rules that can be applied to individual elements
or groups of elements using the style element
- Putting style rules into files using the link element
First we show a simple HTML file with no CSS styling.
The body is composed of a single
div element that
displays as shown at the right.
A simple way to style HTML is to use the HTML
style attribute
which expects CSS style declarations.
The following HTML file adds a
style attribute to the
div
element.
We can also define CSS
rules specifying styles. A rule looks
like this:
selector { declarations }
where
declarations is a semicolon-separated list of
property/value pairs as we have seen, and
selector indicates the
elements to which the
declarations are applied.
Rules can be specified in an HTML document's
head
element using the
style element, as in the example below.
Note that the selector has the form "
#name," where
name is the value of the "
id" attribute of one of the
two
div elements in the page, so only that
div will be
given the associated style.
If the selector in a CSS rule does not specify a specific element id,
like "
#div1," but a general element name, like "
div," then
all
div
elements in the page will be given the associated styles, as in the
example below.
Note that both
div's are styled regardless of their ids.
If the selector in a CSS rule has the form "
.name,"
then
name becomes a CSS "class name" for the associated styles.
In the example below, the class is named "
outer," which is the
value of the
class attribute given to one of the
two
div's in the page, so that
div is styled
accordingly.
CSS classes are useful because they can be easily applied to elements
dynamically created using JavaScript.
Generally useful CSS style rules can be placed into files
called
external style sheets. The advantages are two-fold:
- The styles can be used by more than one web page, and
- The style of any page can be drastically changed simply by
changing style files
Below the CSS style class
outer has been placed in the
file
styles.css.
In the HTML file, the
style element has been replaced by
a
link element indicating where the styles are to be
found. Otherwise the HTML file is the same as the previous one.
styles.css:
To learn about the various CSS properties and their values, see the
W3 Schools
CSS
Tutorial (new window).
In this section we present the development of a constructor
function called
ProblemPanel and associated CSS styles that
ultimately display the FWGC problem solver:
At each step, we show:
- The current ProblemPanel.js file
- The current styles.css file
- A test of the ProblemPanel function using:
The test makes use of these facts:
- The ProblemPanel constructor expects a problem object as
parameter
- A ProblemPanel object has a property called panel
whose value is a DOM element
- The DOM document
object has a property body that returns a DOM element
corresponding to the document's body
The test's display is created with this HTML code:
In the first step, we create the display shown at right. Note:
- The ProblemPanel constructor is called with
a FarmerProblem object as parameter, but in this case it is
not used
- The constructor creates a new div and, using the DOM
property className, styles it with the
CSS class outer
- The constructor creates the panel property whose value is
the created div
In the next step, we add a welcome.
- The centerText, largeBold, and emphasized
classes have been added to style the welcome message
- The welcome function creates and returns a div
element whose text is centered and whose children are
styled span elements
- The span elements are created using
a boldTextElement function that uses the largeBold
style class
- One of the span elements gets its text from the problem
name and is styled with the emphasized class to give it a
contrasting color
In this step, we add the problem's introductory text.
- The justifyText style is added to the style sheet
- The intro function creates and returns a p
(paragraph) element whose text is justified on the left and right
In this step we add the display of the current state of the problem.
- The state, stateCanvas, and stateDisplay
variables are declared in the constructor
function and initialized in the stateArea function
- stateDisplay, a div, contains a header ("Current
State") and the current state display
- Recall that the State object, used as the prototype
for FarmerState objects, defines a makeCanvas method
that creates canvas elements that display state contents
using their toString method
- stateDisplay is positioned and styled with the new style
class left, requiring the use of the "position:
absolute" declaration in both left and outer
- Without setting the CSS position property
to absolute, it will default to static and the
position properties left, right, etc., will be
ignored
In this step we add the display of the move buttons:
- The assistant variable is declared in the constructor
function and initialized in the movesArea function to a
SolvingAssistant object for the problem
- The movesArea function creates and returns a div
that flanks the state display area and is styled with the new
class right (which mirrors left)
- To lay out the move buttons vertically, the movesArea
function creates a ul (unordered list) HTML element:
- ul is styled so that no bullets appear
- ul is populated with li (list item) HTML
elements
- Each li element contains an input HTML element
of type button labeled with the move name
- Each input element is given the same size and styled
with the new class moveButton
- Each input element is given behavior by setting
its onclick property to a function that uses
the SolvingAssistant object to try, and respond to, the
specified move
- When a valid move is attempted, the SolvingAssistant
calls the updateState function which uses DOM operations to
change the state display from the previous state to the new state:
- updateState calls animateMove, which is
defined in the State prototype object to do
nothing. Domain state objects can override animateMove
if they override makeCanvas to produce graphical state
representations.
The buttons in this version work correctly for valid moves, and
the problem can be solved. However, no messages are displayed, and
there is no way to reset the problem to the initial state. These are
described next.
Finally, we add messages and a reset button:
- The messageDisplay variable is declared in the constructor
function and initialized as an HTML p element in
the bottomArea function
- messageDisplay is styled with the emphasized class
so that messages appear red
- A RESET button is created and given appropriate
behavior
- The message display and reset button are placed in a div
that is styled with the bottom class to center it
at the bottom of the display
This completes the development of the ProblemPanel
object.
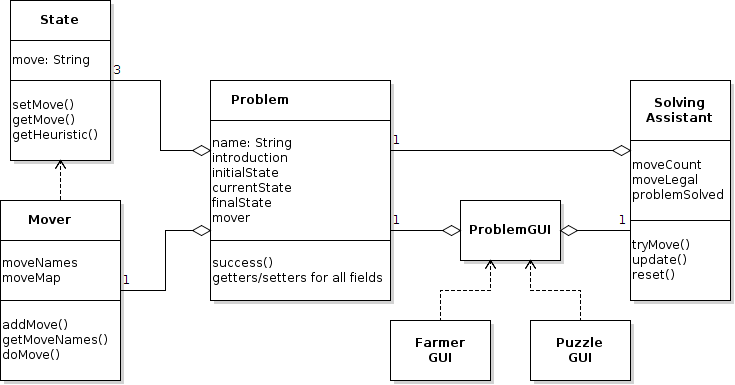
Recall the role of the
ProblemGUI class in the Java Problem
Solver, shown in the class diagram below.
The
ProblemPanel constructor in JavaScript plays an analogous
role to
ProblemGUI in Java:
- Both are written in ways that are entirely free of details of
problem domains (farmers, 8-puzzles, water jugs, etc)
- Both can be used "out of the box" to create full GUI objects for
any of these domains
In the Java application, multiple problem domains were placed in JavaFX
Tabs and collected in a
TabPane.
In JavaScript, we will use the DOM to display among
ProblemPanel
objects using a selector as shown to the right.
We describe a
Chooser constructor function that creates an
object with the demonstrated behavior using this code:
The top-level HTML for our multiple-domain problem solver is shown in
the file
solve.html below.
Note that the code to create the chooser is contained in a function
given as a value for the
onload property of the
window
object.
The
window object represents the browser's
window. The
onload property specifies a function to run when all
the content (including images and multimedia) have been loaded.
solve.html:
First we create a selector without any behavior. See display at
right. The listing for
Chooser.js and the styles it uses are
shown in the menu at left.
- The constructor creates an HTML select
element whose text is styled with the largeBold
class. A select element is a drop-down list like a
JavaFX ChoiceBox.
- The selector is given options (using the HTML option
element), starting with the default "Choose a Problem" option,
followed by options corresponding to the problem names. Note the
use of the addOption helper function.
- The selector is appended to a new div
("headerDiv") that is styled with the new style
class header so that the selector is properly centered in
the display
- The constructor creates a property called select
whose value is a new enclosing div
containing headerDiv and, potentially, the
user-selected problem panel
- The select div will have problem panels appended to it and
removed from it as the user makes selections
When a new selection is made, we must be able to quickly and
efficiently change problem panels in the display.
This is facilitated by initially storing the problem panels on
a
panelMap using the problem names as keys:
To give the selector its behavior, we define its
onchange
method, which is called whenever a new selection is made.
We use the variable
problemPanel, initially null, to refer to
the currently displayed problem panel.
When
onchange is called,
- We first check if problemPanel
is not null, in which case we use the DOM method removeChild
to remove it from the display.
-
Then we examine the new selection:
- If it is "Choose a Problem", then problemPanel is set to
null
- If not, we use panelMap to set problemPanel to the
new selection and add it to the display
See below. The full listing is shown in the menu to the left.