jQuery is a cross-browser JavaScript library with built-in
functions useful for, among other things:
- Easily manipulating the DOM, and
- Producing graphical effects
We will use jQuery so that our problem chooser works as shown below.
Note the effects produced when the problem is changed or
solved.
- You can download the library from jQuery.com and access
it as you would your own JavaScript files:
-
You can also get it from a content delivery network:
Until now we have launched code when a webpage loads using
an
onload function:
This method suffers from the fact that code is not run until all page
elements, including images and multimedia, are loaded.
With jQuery, we can run code in response to a
ready
event:
This has the advantage of running the code as soon as the document is
ready to be manipulated, possibly before all images and multimedia have
loaded.
The "
$(document)" and "
$("body")" constructions are
examples of
jQuery selectors.
The most basic concept of jQuery is to "select some elements and do
something with them."
This section describes some of the jQuery selection expressions.
Each expression looks like "
$("...")" where the "
..."
matches something in the document being rendered.
jQuery selectors are similar to CSS (Cascading Style Sheet) selectors,
which are used to select parts of a web page for styling.
With regular JavaScript, getting the DOM object associated with a
particular element's id is accomplished with the
getElementById
method associated with the
document object.
For example, when testing our FWGC and water jug objects, we used:
With jQuery, use
$("#myId"):
It is important to note, however, that the objects returned
by
document.getElementById("myId")
and
$("#myId") are not interoperable; the former returns
a DOM object while the latter returns a jQuery object.
To select all elements of the same type from a document, for example,
all HTML
ul (unordered list) elements, use
$("name"),
where
name names the element. Example:
returns an array of all
ul elements in a document.
You can also select child elements of an element:
selects all
li (list item) elements from all unordered lists in a
document.
You can also select children specifically from an element given by id.
selects all list items of the list whose id
is
moveList.
Here are a few of the other kinds of jQuery selectors:
- By attribute. For example,
gets the elements specified with the rows attribute (e.g.
a textarea element).
- By attribute value. For example,
gets the elements specified with the cols attribute with
value 10.
- By child position. For example,
gets the first child of the element whose id is moveList. If
this element is an unordered list (ul) then this would
return the list's first list item (li).
- By CSS class. For example,
gets the elements specified with the attribute class="border".
Here is how our
Chooser object creates the HTML
elements that allow the user to choose a problem:
- A top-level div element is created that will hold both the
selector (a drop-down list)
and the selected problem panel. This element is the value of
the select property of the Chooser.
- A select element is created that will hold the problem
names in a drop-down selector
- The selector is added to a newly created headerDiv
- headerDiv is added to the top-level div
With regular JavaScript, creating a new element for adding to the DOM
is accomplished with the
createElement method associated with
the
document object, as shown to the right.
With jQuery, elements can be created directly:
Note:
- The element creation syntax follows that of other jQuery
selectors
- A jQuery object can be created from a DOM object using
$(object), where object is a reference
to a DOM object
The
append method is one of several jQuery methods for
manipulating and traversing the DOM.
append() inserts content
at the end of
the selected HTML element. For example, to continue the previous example,
This replaces the regular JavaScript, shown to the right, that uses the
DOM's
appendChild method.
It's important to remember that, in the regular JavaScript code, the
variables
headerDiv and
selector refer to DOM objects,
while the jQuery counterparts do not.
The adding and removal of DOM elements are both performed in
the
updateState method written for regular JavaScript to the
right.
While regular JavaScript uses
removeChild to remove elements,
jQuery provides a
remove method as shown below.
Note:
- While removeChild is given an explicit argument to
remove, remove is called on the object to be removed
- The example below shows the use of the jQuery selector
$(object), where object is a reference
to a DOM object
The jQuery
text() method sets or returns the text content of selected
elements.
With no arguments,
text() acts as a getter; with an argument, it
acts as a setter.
Below is an example of its use as a setter. The
addOption
function is used to add options to the problem selector.
Compare this with how it is done in regular JavaScript as shown to the
right.
- In the JavaScript example,
the text property is attached to the DOM's option
object
- In the jQuery example, text is a jQuery method
The jQuery
addClass() method adds a specified CSS class to selected
elements.
Below is an example of styling the
selector and
headerDiv
in the previous example with the CSS classes
largeBold
and
header, respectively. (See the menu for
the
styles.css file.)
Compare this with how it is done in regular JavaScript as shown to the
right.
- In the JavaScript example,
the className property is attached to DOM
objects
- In the jQuery example, addClass is a jQuery method
In the regular JavaScript example to the right, the DOM
properties
type,
value, and
style were used to
create the move buttons.
In jQuery we accomplish the same thing with
the
attr,
val, and
css methods as shown below.
- Like the text method, the val method acts like a
getter with no arguments, and like a setter with one argument. It
is used in place of the DOM value property. In the example,
it labels the move button with the move name.
- The attr and css methods act like a getter with
one argument, and like a setter with two arguments:
- attr gets the value of the HTML attribute named by
its first argument. If there is a second argument, it
specifies a new value for the attribute
- css gets the CSS style class named by
its first argument. If there is a second argument, it
specifies a new style class for the name
Form fields are HTML elements used in web pages to allow users
to give information that can be sent to a server as
form values.
Our problem solver web page does not send information to a server, but
it does use form fields to display information and to respond to user
events.
The jQuery
val() method sets or gets the value of form fields.
With no arguments,
val() acts as a getter; with an argument, it
acts as a setter.
Here is another example of its use as a setter when the problem solver
needs to update the current state:
Compare this with how it is done in regular JavaScript with
the
value property attached to the DOM's
Textarea
object:
In the problem solver web page, the current state is displayed in
a
textarea element.
The size of the text area is controlled by its
rows
and
cols attributes, which could be given directly, as in:
However, the number of rows and columns in the current state display
changes depending on the problem, so in our regular JavaScript approach
we used the
rows and
cols properties provided with the
DOM's
Textarea object:
With jQuery, we use the
attr() method, which is used to get and
set attribute values for jQuery-selected objects.
Here is how the
rows and
cols attributes of
the
textarea element are changed using the setter form:
Note that using
attr with one argument
(e.g.
attr("rows")) gets the value of the named attribute for
the selected element.
CSS (Cascading Style Sheets) are used to control the style and layout
of web pages.
For details, see the
W3 Schools CSS Tutorial and the CSS discussion below.
One way CSS styles are added to web pages is with HTML's
global
style attribute, which assigns values to various CSS
properties such as
width,
height,
margin, etc.
Here are examples from
solve.html:
Sometimes CSS properties cannot be directly coded in web pages and must
be specified under program control. This section gives an example.
One bit of styling that cannot be coded in
solve.html is the common
width of the move buttons, which is computed in JavaScript with:
In regular JavaScript,
bSize can be used along with the
DOM's
style object and associated properties to change the width
of a button:
In jQuery, the
css() method is used to get or set
the
style attribute of a selected element. Here is a use of the
setter:
Note that using
css with one argument
(e.g.
css("width")) gets the value of the named CSS property for
the selected element.
We already saw an example of a jQuery event handler:
The
ready() method specifies the function to run when a ready event
occurs.
Ready events are only defined for the current document and are fired
when the document is loaded.
jQuery provides ways of handling a variety of events including mouse,
keyboard, and form events.
This section gives two examples of writing event handlers in jQuery.
As shown to the right, we added behavior to move buttons in regular
JavaScript by setting the
onclick property of DOM objects.
In jQuery, assuming
button has been jQuery-selected, the same is
accomplished as shown below, using the jQuery
click method.
The drop-down menu displaying problem options in our problem solver
reacts to a change by displaying a different problem.
As shown to the right, we reacted to selection changes in regular
JavaScript by setting the
onchange property of DOM objects.
In jQuery, we use the jQuery
change method as shown
below. Note:
- We use the "arrow function" syntax (like a lambda expression)
for representing the change behavior
- We could change the problem panel by using append
and remove, but here we accomplish the same thing with the
jQuery methods show and hide
- show and hide are examples of
jQuery effects
Here is how
solve.html is displayed in the browser with all
element handling performed by jQuery:
Here is the new source of
solve.html:
Here is the new version of
solve.js:
jQuery provides special screen effects including (the following links
display jQuery tutorial pages in a new window):
As shown to the right, our current selector change behavior uses
jQuery
show and
hide effects.
To get the sliding effect, we use the jQuery
slideUp
and
slideDown methods as shown here:
Note:
- The speed parameter, 500 milliseconds, indicates that the
effects will take half a second
- If the user selects "Choose a Problem," the currently
displayed problem panel slides up
- If the user selects a different problem, the currently
displayed problem slides up, the newly selected problem panel is
found, and that problem panel slides down. This is accomplished
by using the optional second callback parameter
to slideUp, which must be a function.
The callback parameter is necessary. It does not work to simply do
this in the else clause:
because the slideUp and slideDown will not occur
consecutively, and the effect will be lost.
When the user solves a problem, the congratulatory message starts small
and grows to a larger normal size. The font color changes as well.
The message display is represented by an HTML
p (paragraph)
element. The new function
animateCongrats, shown below, uses the
jQuery methods
css and
animate to size, color, and
animate the element.
As shown to the right, a call to
animateCongrats is added to
each button action in the event the problem is solved.
The size and color of the message display element need to be restored
when the message is cleared, as shown below.
When the congratulatory message is displayed, the move buttons need to
be disabled until the problem is reset.
We could do this using the
disabled attribute for HTML form
elements, but here we use jQuery methods to
fadeOut the
ul
element holding the move buttons when the problem is solved (see at
right), and then
fadeIn
that element when the reset button is clicked (see below).
Note that this requires that the jQuery variable
movesUL be
defined at the top level of the
ProblemPanel constructor, so
that it is available to the various button actions.
Some facts:
- jQuery uses the same method of selecting HTML elements for manipulation
as CSS (Cascading Style Sheets) use for style property
manipulation.
- jQuery animation requires the use of CSS properties and their
values
- The sliding effect for the problem solver is only possible if
its layout is accomplished with CSS (and not an HTML table)
Recall that the original version of the problem solver used an HTML
table to lay out the GUI components.
With the availability of CSS, the table method has become obsolete.
Also, the jQuery sliding effect does not work well with tables.
So, this section describes changes to the problem solver that make more
effective use of CSS and jQuery.
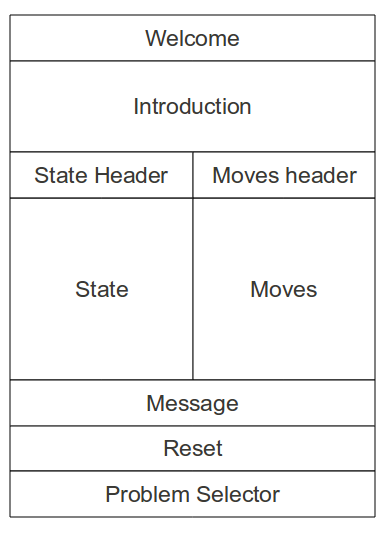
In the original version the problem solver interface was implemented
through a 7 x 2 table with some rows spanning two columns.
The only use of CSS was through explicit
style attributes that set
margins, padding, alignment, color, etc.
Note the use of the
problemTable element for the overall
arrangement and the
moveTable element for the move buttons.
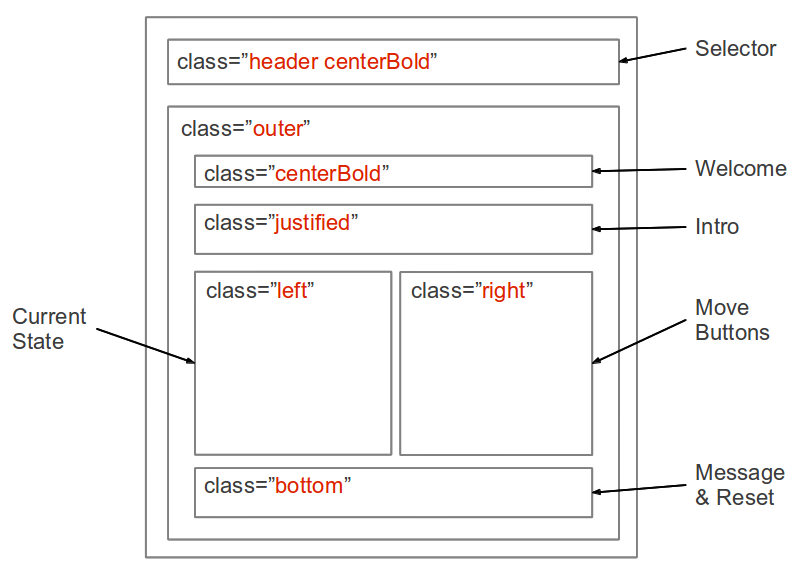
The CSS approach uses primarily div, span, p
(paragraph), and ul (unordered list)
elements with CSS classes to achieve the layout — no tables.
Below is the new source of
solve.html.
Note the use of two top-level elements:
- A div containing the problem selector
- A div named "problemPanel" containing the elements to
which we want to apply the jQuery sliding effect.
Also, the move buttons are no longer arranged in an HTML table, but
an
unordered list — a
ul element with the
same "
moveTable" id — which works better with
the jQuery sliding effect.
The JavaScript code is changed in order to:
- Implement the slide effect
- Arrange the move buttons in a list
The slide effect is called on the
problemPanel.
Note that
displayProblem is renamed to
changeProblem to
accurately reflect what is occurring.
We rename the
table variable to
moveList to refer to
the
ul element that contains the buttons.
When the problem is changed, instead of appending a new row to a table,
we append a new item to the list:
To use jQuery in the JavaScript problem solver, only
the
ProblemPanel and
Chooser constructor functions are
modified.
Their redefinitions are contained in the files
ProblemPanelJQ.js
and
ChooserJQ.js, seen in the menu at left. They need to be
added to the
js/framework/gui folder.
To launch the problem solver in the browser, run
the
solveJQ.html file, also shown at left. It needs to be added
to the top-level folder.